This is a step by step guide for the Implementer that explains what's needed to set up OpenLMIS and a step by step guide to complete the setup of OpenLMIS version 3 (In Progress - document updates for version 3.5 in parentheses below)
This is a living document that continues to be updated as development continues. Please reach out if you have questions.
This is a step by step guide for the Implementer that explains what's needed to set up OpenLMIS and a step by step guide to complete the setup of OpenLMIS version 3 (In Progress - document updates for version 3.5 in parentheses below) |
The OpenLMIS community believes in a world where all countries have the data they need to manage their health supply chains and lead to healthier communities. We are a community initiative and a software platform working to make this vision a reality.
The OpenLMIS software is an open source electronic logistics management information system (LMIS) purpose-built to manage health commodity supply chains. OpenLMIS is rooted in the "Common Requirements for Logistics Management Information Systems" using the Collaborative Requirements Development Methodology (CRDM). OpenLMIS supports a wide range of business process needed to manage complex (multi-program and multi-level) supply chain(s).
Additional Resources:


In accordance with the "Common Requirements for Logistics Management Information Systems" using the Collaborative Requirements Development Methodology (CRDM), the following business process are supported within OpenLMIS version 3.x:
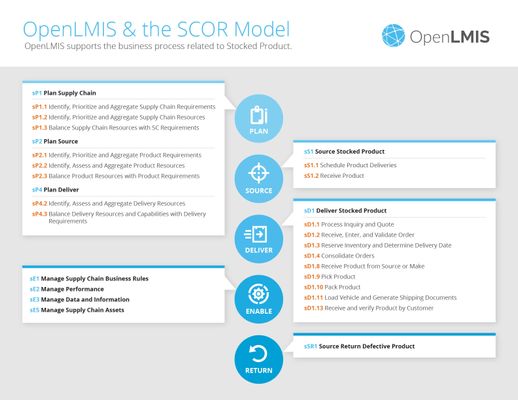
In accordance with the APICS Supply Chain Operations Reference Model (SCOR) framework, the following business processes related to Stocked Product are supported within OpenLMIS version 3.x:
What features are included in OpenLMIS?
New features are added continuously with each release. For details on what features were added when, it is best to review the Functional Documentation page in combination with the release notes.
OpenLMIS supports "pull" (requisition-based replenishment). This is configurable on a per-program basis. For requisition-based replenishment, facilities are expected to submit requisitions for each program, on a cyclical basis, based on which schedule their "pull" program operates on.
![]() The entire list of terms used in this document are located here (Glossary/Definitions) for reference as you are reviewing the Configuration Guide.
The entire list of terms used in this document are located here (Glossary/Definitions) for reference as you are reviewing the Configuration Guide.
Replenishment Process and Requisition Workflow in OpenLMIS
The following is an introduction to some of the basic concepts and objects used in OpenLMIS. The words that are linked below refer to specific objects that must be created in OpenLMIS as part of setting up the system (e.g., Configuration Guide for Implementer/Administrator#Program, Configuration Guide for Implementer/Administrator#Orderables). When setting up OpenLMIS for a production deployment, a system administrator will need to create these objects in the system, in addition to several other types of objects described below that are intrinsic to OpenLMIS's operation.
OpenLMIS supports customizable Configuration Guide for Implementer/Administrator#Geographic Hierarchy for Geographic Zones or administrative areas. This includes customization of the number of Geographic Levels in the hierarchy, as well as the labels for each level in their hierarchy (for example: Country | Province | Region | District or alternatively as: Country | State | County ).
OpenLMIS supports Facilities that function as Service Delivery Points, and facilities that function as warehouses or "supply depots" to replenish other facilities. A single facility can be an SDP or warehouse, or both an SDP and a warehouse. Facilities can be further classified by type (e.g., dispensary, health center, regional hospital, teaching hospital). OpenLMIS also supports custom Facility Types which can be used to segment product availability, and for reporting purposes.
OpenLMIS supports one or more Programs, all of which are customizable. For example, a healthcare network could operate a general ART program or it could operate distinct ART programs, such as a Pediatrics ART program and a separate Adult ART program. Hypothetically, these distinct Pediatrics and Adult ART programs could be differentiated by the products available in each program.
OpenLMIS supports grouping Configuration Guide for Implementer/Administrator#Orderables or Products by category (e.g., antibiotics, analgesics, etc.). OpenLMIS uses the terms Products and Orderables interchangeably as shown in more detail in the Orderables section below. The choices for Product Categories are customizable. OpenLMIS allows segmenting products on a per-program basis (e.g., Depoprevara would be offered in a Reproductive Health program, but not in a Malaria program). Individual products can be assigned to one or more programs (e.g., Doxycycline could be used in both the Essential Medicines and Malaria programs). Products are typically further segmented by facility type (e.g., experimental ARVs could be available to teaching hospitals, whereas only fully qualified ARVs would be available at village dispensaries, since there is less concern about risks from undocumented side effects. Note that medical supplies are commonly referred to by several different terms, including orderables and products.
OpenLMIS supports customizable Processing Schedules that define the Processing Periods or calendar intervals at which facilities are replenished. Each schedule is typically divided into uniform periods, such as months or quarters. OpenLMIS supports having multiple schedules tailored to how each program and/or geographic region is managed. For example, there could be three different quarterly schedules, each staggered to start on a different month of a calendar quarter. When performing replenishment calculations, OpenLMIS automatically takes into account the length of each replenishment interval and calculates order quantities accordingly. This is configurable on a per-program basis. For requisition-based replenishment, facilities are expected to submit requisitions for each program, on a cyclical basis, based on which schedule their "pull" program operates on.
OpenLMIS uses a mechanism called Configuration Guide for Implementer/Administrator#Requisition Group to manage the replenishment process. A requisition group is a "container" for gathering together a group of facilities that run the same programs, on the same schedule, rely on the same supervisory hierarchy for review and approval of their requisitions, and rely on the same warehouse to fill their approved orders. The requisition group provides a convenient mechanism for managing the schedule and workflow for all these ART clinics, on a group basis.
Now that you understand the replenishment requisition and fulfillment processes, the next step will be to gather and prepare the reference data to complete the OpenLMIS setup.
There are several sets of data that the team must gather, in preparation for setting up OpenLMIS. These will include (in the recommended order of loading/setting them up):
Many of these sets of data may already be contained in legacy systems, stand-alone databases, or spreadsheets. The configuration steps listed below include a list of attributes or fields that must be assembled for each of the objects that you will create in OpenLMIS, e.g. facilities or orderables, and should be used to your gathering of the data. OpenLMIS has a tool that can help implementers in loading the above data: https://github.com/OpenLMIS/openlmis-refdata-seed
The default administrator account that is initialized when OpenLMIS is first installed is username = Administrator password = password.
These login credentials are in the public domain and are maintained here, so the first step is to create a new user account with administrator rights, and then disable this default account. Log in with above credentials, then from the main menu, go to: Administration, Users.
Click on the [Add User] button, then enter the basic information for the new user account as well as creating a password for the account by selected the Reset Password link below.

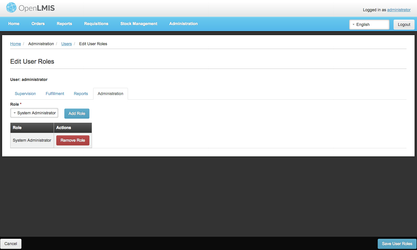
Now the new user account needs administration rights. To set this up, go to Administration, Search for the User: Administrator, then select Edit. It will bring you to the Edit User Roles screen where you can assign the Administration type role to the user as shown below and Save User Roles. Once the user has been assigned the Administration role the OpenLMIS set up can begin.
OpenLMIS relies on three different methods to fully configure the system:
Each of these methods will be used at different stages of the overall setup process to fully configure the system. Working with administrative user screens is required at various points in the setup process, starting with setting up an OpenLMIS administrator account (as shown above). Administrative user screens will also be used in the latter stages of the setup process, for example, to define the schedule(s) that your replenishment cycles will operate on, to configure requisition forms, create additional user roles, and assign new users to specific roles.
First, you will learn more about each set of data within the system. Then you will be shown how to set it up, and given an example to reference as you are completing this process. Now let's begin the process of setting up OpenLMIS.
Google translations affect the calculations. The translation plugin changes the markup causing the calculated quantities to be incorrect and breaking their update. We recommend not to use Google Translate but rather OpenLMIS built-in translations.
In this step you will learn about setting up OpenLMIS. This step involves creating various attributes and associating reference data. The setup must be followed in this order to ensure data exists for the next attribute. This setup process includes the following:
Setup Basic Attributes that are used to characterize Products and Facilities
Product Categories are used to sort products by a logical order within the R&R form. These categories should make sense to any user that views R&R forms so they can associate the section they are working in as they are completing or reviewing the forms.
Setup Product Categories
Example:
Category Code (required) | Category Name (required) | Display Order (required) |
|---|---|---|
| FP | Family Planning | 10 |
| hiv | HIV Control Program Medicines | 14 |
Dosage Units are the different units in which individual doses or items that are given to a patient can be quantified.
Setup Dosage Units
Example:
| Dosage Unit Code (required) | Display Order (required) |
|---|---|
| mg | 1 |
| ml | 2 |
Understanding Orderables, TradeItems, and CommodityTypes
This is example will explain how to set up Orderables within OpenLMIS but does not complete any associations with Trade Items or Commodity Types as referenced above. The reference data for Orderables or Products within your organization will determine which setup process (Orderables, Commodity Types, Trade Items) to use when creating these objects in OpenLMIS.
Full Supply orderables are Full-supply products that are assumed to have a "max periods stock" or "ideal stock amount" defined by the MoH, and OpenLMIS calculates reorder amounts to replenish SDPs up to this target amount. Non Full Supply orderables are products that are assumed to be available on an irregular basis, with no guaranteed ideal stocking level. When an Orderable is designated as Full Supply, it will appear on the standard program requisitions. Identifying when a product is Full Supply or Non Full Supply begins in the example below.
![]() Only include products which are needed, especially for non full supply products because it can impact performance if the list reaches into the thousands, and can decrease usability by making it challenging for users to find products.
Only include products which are needed, especially for non full supply products because it can impact performance if the list reaches into the thousands, and can decrease usability by making it challenging for users to find products.
Example of two Orderables:
The pack rounding threshold attribute affects how OpenLMIS calculates the number of packs to ship to restock a facility. Note that product inventory and usage are generally reported in "dispensing units," as part of the requisitioning process, where a dispensing unit is the basic unit that a patient is provided when the clinician or pharmacist gives them the product. However the warehouse will ship "packs" of a product, and a pack can contain one or more dispensing units. For example, a dispensing unit for an antibiotic might be a strip of 10 capsules, and the corresponding pack could be a box of 24 strips. OpenLMIS performs the initial calculations for the quantity of each product to ship an SDP in terms of dispensing units, rather than doses or packs. OpenLMIS's last step in these calculations is to round up or round down the number of packs to ship to the SDP. The value of this Rounding Threshold attribute determines when OpenLMIS rounds up or rounds down the number of packs to ship.
Returning to our example of strips of antibiotic capsules, if the rounding threshold is set to 6 for this product, then OpenLMIS will round up the number of packs to ship whenever the calculated order quantity of dispensing units that are beyond full packs is greater than this threshold value. For example, if the reorder quantity for the antibiotic is 52 strips, this would equate to 2 full packs plus 4 additional strips (2 x 24 + 4 = 52). Because the rounding threshold for this product is 6, OpenLMIS will round down the order to 2 packs. Conversely, if the reorder quantity for the antibiotic is 55 strips, this would equate to 2 full packs plus 7 additional strips (2x24 + 7 = 55). Because the rounding threshold for this product is 6, and the 7 additional strips exceeds this threshold, OpenLMIS will round up the order to 3 packs. Remember, packs are the units in which the warehouse ships products. Note also, OpenLMIS rounds up when the extra number of dispensing units is greater than the threshold, not when it is greater than or equal to the threshold.
The can round to zero attribute determines whether OpenLMIS will round the number of packs to ship down to zero when the reorder quantity is less than one full pack and is less than or equal to the rounding threshold for this product. For our antibiotic example, if the reorder quantity was 6 strips (equal to the rounding threshold), then OpenLMIS would round the order quantity down to zero packs if can round to zeroes true. Conversely, it would round the order quantity up to one if can round to zeroes false. In other words, when can round to zeroes set to false, OpenLMIS will always ship at least one full pack when the reorder quantity is one or more dispensing units. If the reorder quantity is zero dispensing units, then OpenLMIS will ship zero packs, regardless of the value of can round to zero.
| Program (required) | Product Code (required) | Product Name (required) | Description (optional) | Active (required) | Full Supply (required) | Display Order (required) | Price Per Pack (optional) | packRoundingThreshold (required) | netContent (required) | roundToZero (required) | dispensingUnit (optional) | children (optional) |
|---|---|---|---|---|---|---|---|---|---|---|---|---|
| Essential Meds | AA000300 | Mercaptopurine | TRUE | FALSE | 1 | 2154.65 | 1 | 1 | FALSE | Each | ||
| Family Planning | FP000400 | Postinor (Levonogesterol) | TRUE | TRUE | 1681 | 6940.30 | 1 | 1 | FALSE | Each |
Now that you've used your reference data to complete the setup of Orderables, the next step is to set up the objects for Programs, Processing Schedules, and Periods.
Understanding Programs, Processing Schedules, and Periods
A Program is a grouping of Orderables and Trade Items. Each Program has:
For example, a Malaria program may be operating in a country in parallel with a Family Planning program. The Malaria and Family Planning programs may have their own sets of Orderables, users, warehouses, clinic facilities, and configurations. Sometimes TradeItems and Orderables may overlap between Programs. A specific medicine may be provided by two different programs backed by two different funders and/or supply chains. Even though it is the same TradeItem, it may have a different configuration in each program. Perhaps a different cost to account for or a different hierarchy of approvals, for example.
A Processing Schedule must be defined for each Program so that you can determine the Requisition Groups that are required. Processing Schedules are required to determine the Requisition Group that is used to operate the Program at that facility. For requisition-based replenishment, facilities are expected to submit requisitions for each program, on a cyclical basis, based on which schedule their "pull" program operates on. There can be many different processing schedules for varying Programs in the same Requisition Group, but they cannot be different processing schedules for the same Program in the same Requisition Group. This scenario creates confusion on which schedule the program's requisition workflow follows.
Once a schedule has been created, you need to define the individual periods that comprise the schedule. Processing Periods define individual start and end dates associated with a Processing Schedule. OpenLMIS allows you to specify any "start date" and "end date" for each period in a schedule and makes no assumptions about automatically creating periods for a new schedule. New periods are not automatically created so the administrator must create them as needed, to not delay the creation of requisitions. The start date can be further back in time to support migration of data from a legacy system, however there can be no gaps between two consecutive periods. As you are creating periods, the system automatically sets the start date for the new period as one day after the end date of the preceding period. The system does not allow deleting periods once replenishment activity has been initiated for that period, and also does not allow deleting a period from the middle of a schedule.

Setting up Programs
![]() If the requisition has already been submitted though, and had its authorization step skipped, it will still be available for approval, even after disabling this flag.
If the requisition has already been submitted though, and had its authorization step skipped, it will still be available for approval, even after disabling this flag.
Example:
| Program Code (required) | Name (required) | Description (optional) | Active (required) | Period Skippable (required) | Show Non Full Supply tab (required) | Skip Authorization Step (required) |
|---|---|---|---|---|---|---|
| PRG002 | Essential Meds | Essential Medicines Program | TRUE | TRUE | TRUE | FALSE |
| PRG001 | Family Planning | Family Planning | TRUE | TRUE | FALSE | FALSE |
| PRG004 | EPI | EPI | TRUE | TRUE | TRUE | TRUE |
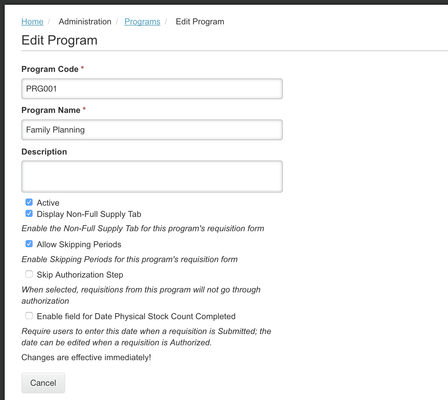
![]() Any changes to Program Settings are effective immediately
Any changes to Program Settings are effective immediately
Setting up Requisition Date Physical Stock Count Completed
An optional setting allows you to configure whether the Requisition Form for each program will prompt users to enter a 'Date Physical Stock Count Completed' or not.
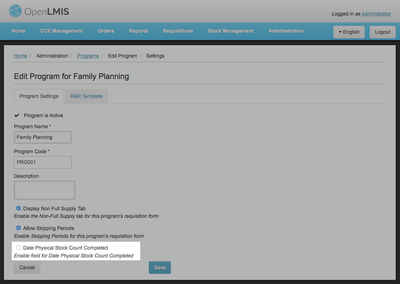
Administrators can enable or disable this under Administration > Programs > Program Settings (screenshot above). By default, this is disabled for each Program. If you Enable it and click Save, it will take effect for all Requisitions for that Program.
When this setting is enabled for a program, any user Submitting or Authorizing a Requisition in that program will be prompted to enter a date that the Physical Stock Count was completed:
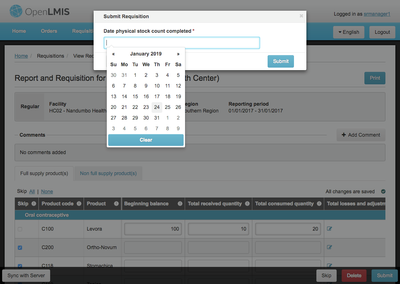
The date prompt first appears when a user Submits a Requisition. A date is required at that time. The date prompt appears again when a user Authorizes the requisition, allowing the authorizing user to view and change that date, if desired. For requisitions where this date has been entered, the date appears in the gray header at the top of the Requisition for all users who can view the Requisition.
The Requisition form saves some of its data in the Stock Management service so that it can be viewed on stock cards. When the setting is enabled, the date captured during the Requisition submission and authorization will be used by the Stock Management service to record the stock quantities as of that specific date. When the setting is disabled, then no such date is captured from users, and the Stock Management service will record stock quantities by using the ending date of the requisition period.
The benefit of enabling this setting is more accurate stock transaction records, although it does require users to conduct data entry of a date during the requisition process.
This setting takes effect immediately, including for in-progress Requisitions. Administrative permissions (to the Program Settings page) are required to change this setting. As soon as this setting is enabled or disabled, users Submitting or Authorizing a requisition will notice this change. This feature was first introduced with OpenLMIS 3.2.0. For background about this feature, see the ticket as well as the wiki documentation Connecting Stock Management and Requisition Services.
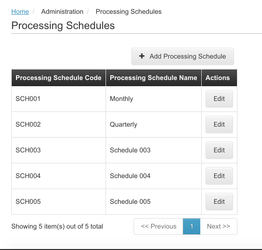
Setting up Processing Schedules
Example:
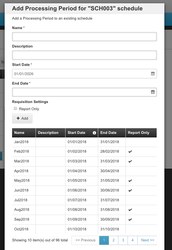
Setting up Processing Periods
Example:
| Name (required) | Description (required) | Start Date (required) | End Date (required) | Processing Schedule (required) | Report Only (requisition setting) |
|---|---|---|---|---|---|
| Jan-18 | Processing period for January 2018 | 1/1/18 | 1/31/18 | MPS | FALSE |
| Feb-18 | Processing period for February 2018 | 2/1/18 | 2/28/18 | MPS | TRUE |
| Mar-18 | Processing period for March 2018 | 3/1/18 | 3/31/18 | MPS | TRUE |
Now that you have completed set up of the Programs and associated schedules, you will setup your geographic hierarchy.
(In here we will also need to explain the process of how locations are created, the resources used and unused, how the update process works, and the association between facility and geographic zone: Chongsun Ahn (Unlicensed) to update)
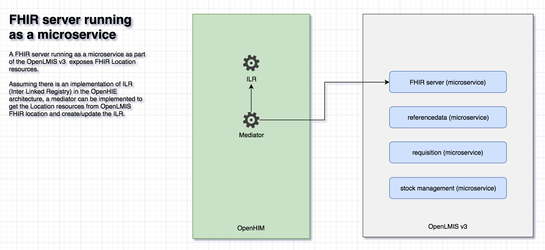
There are two primary use cases that can benefit from an FHIR server implementation in terms of OpenLMIS serving mCSD locations as a provider and consuming locations as an update consumer.
In this use case, the assumption is that the OpenLMIS implementation is a Care Service Update Provider. OpenLMIS owns an authoritative list of some or all of the Locations and provides those to the federated master facility list management infrastructure. Parts of the facilities that OpenLMIS owns includes supply chain locations like stores, dispensary units. To support such an implementation with as standard compliant service as possible, OpenLMIS can expose read-only FHIR Location resources. In the OpenHIE Architecture, a mediator is able to access the FHIR Location resources that are exposed from OpenLMIS and populate the Interlinked registry.
OpenLMIS v3.5 uses a FHIR server running as a microservice in OpenLMIS.
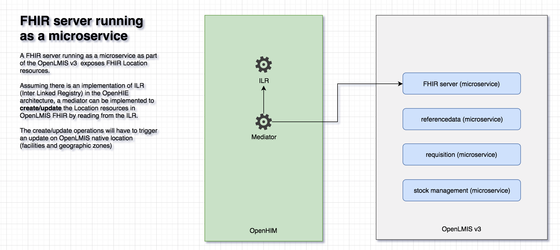
Assumes that there is an implementation of an Authoritative Master Facility List that supplies mCSD conforming Location resource. In this case, OpenLMIS needs to be able to consume those Locations and Updates as mCSD update consumer. The Locations from the other owners are created in the OpenLMIS as appropriate entities like geographic zones and facilities. However, In OpenLMIS, no update is allowed to be made on these Locations that are created and owned by others.
Understanding Geographic Hierarchy, Levels, and Zones
OpenLMIS identifies facility locations using a Geographic Hierarchy that is made up of Geographic Levels and Zones. A Geographic Hierarchy helps in outlining the characteristics that make up each level and zone. Geographic Hierarchy also supports reporting, especially when doing comparison reporting of certain trends by region or district. An example of a Geographic Hierarchy is Country, Region, District, where the first level in the Hierarchy is the Country, the second level is Region, and the last is District. A Geographic Level is each level within the hierarchy. A Geographic Zone is the lowest level of the hierarchy and facilities are assigned to a Geographic Zone in the Facility setup detailed in the next section. Although a Geographic Zone is the lowest level of the hierarchy, it does not need to be a the lowest possible level a facility is identified. For example, you would not set up a separate Geographic Zone for every facility, but instead determine the lowest level that reporting needs to use, unless the system is only supporting one facility. Then the setup would only have one zone and one level.
Setting up Geographic Levels and Zones
When defining Geographic Levels you should consider the level that your organization operates on, and which level has the highest rank. If you are operating only regionally, then the Region or Province would be at your highest level, but if you are operating Nationally, then the Country would be your highest level. When creating the hierarchy and levels there is a natural parent to child hierarchy that needs to be defined in the system. The Geographic Zone should be the lowest level that your organization needs to use for reporting because it defines the location of a facility, and the zone is used when creating facilities to associate in reporting. A system intended for use at the national level should use something analogous to “Country” as the highest-defined Level. Likewise, an instance of OpenLMIS intended for use no higher than at a regional Level should something like “Region” as the highest-defined Level. In all cases, the lowest-defined Level should correspond to the most specific granularity within which facilities should be defined.
Geographic Level Example:
| Code (required) | Name (required) | Level Number (required) |
|---|---|---|
| Country | Country | 1 |
| Zone | Zone | 2 |
| District | District | 3 |
Geographic Zone Example:
| Code (required) | Name (required) | Level (required) | Parent (optional) | Catchment Population (optional) | Latitude (optional) | Longitude (optional) |
|---|---|---|---|---|---|---|
| Malaw | Malawi | Country | ||||
| cwes | Central West | Zone | Malaw | |||
| cest | Central East | Zone | Malaw | |||
| seas | South East | Zone | Malaw | |||
| NU | Ntcheu | District | cwes | |||
| LL | Lilongwe | District | cwes | |||
| BLK | Balaka | District | seas |
Now that you have completed the Geographic Levels and Zones, you will use the objects to set up your Facilities.
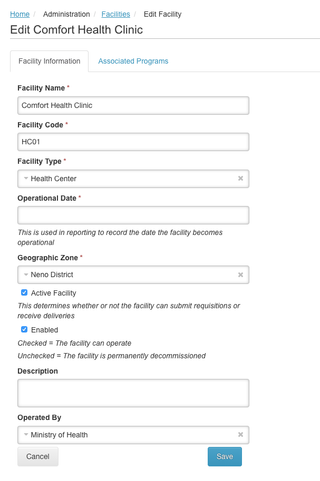
Understanding Facilities, Facility Types, and Facility Operator
Facilities in OpenLMIS is a term used to identify a location that is part of your requisition process. These can be identified by facility types such as health clinics, district hospitals, or warehouses, or even as multiple locations within a district hospital or health clinic. Facilities are used in all of the modules of OpenLMIS: the requisition process, fulfillment, stock management, orders and reporting. Facilities may have one to many Programs and one to many Processing Schedules. A facility cannot have the same Program on different Processing Schedules. Facilities must be set up in order to begin user setup and management for requisition and fulfillment based roles.
Facility Types are used to allow the different assignments of facility type approved products. Reports from the system also list the facility type for reference. There can be many different facility types such as health clinics or district hospitals. Facility Types are also used to assign a program with multiple templates.
The Facility Operator is not required but is useful when generating reports (such as a coverage rate comparison by facility operators). The Facility Operator can be defined in terms of the types of organizations that are operating at facilities. Examples are Ministry of Health or Doctors with Borders.
Setup Facility Type, Facility Operator, and Facility
First the Facility Type and Facility Operator must be set up because these sets of data are used to support the setup of a Facility. For each Facility Type a type, name, description, display order, and active designation should be defined, but not all fields are required. The Facility Operator is not required.
Facility Type Example:
| Facility Type (required) | Name (required) | Description (optional) | Display Order (required) | Active (required) |
|---|---|---|---|---|
| Warehouse | Balaka District Warehouse | Balaka District Warehouse | 3 | Yes |
| Health Center | Kankao Health Facility | Kankao Health Facility | 1 | Yes |
| District Hospital | Balaka District Hospital | Balaka District Hospital | 2 | Yes |
Facility Operator Example:
| Code | Name | Description | Display Order |
|---|---|---|---|
| MOH | Ministry of Health | Ministry of Health | 1 |
![]() If a facility is no longer in use, updating the Active designation to 'No' will not remove the facility from all user's views. An inactive facility remains in a user's navigation menu for historical purposes, such as viewing historical reports.
If a facility is no longer in use, updating the Active designation to 'No' will not remove the facility from all user's views. An inactive facility remains in a user's navigation menu for historical purposes, such as viewing historical reports.
Facility Example:
| Facility Code (required) | Name (required) | Description (optional) | Geographic Zone (required) | Facility Type Code (required) | Facility Operator (optional) | Active (required) | Go Live Date (Operational Date - required) | Go Down Date (optional) | Comment (optional) | Enabled (required) |
|---|---|---|---|---|---|---|---|---|---|---|
| HF01 | Kankao Health Facility | Southern Region | Health Center | YES | 01/01/2016 | YES | ||||
| WH01 | Ntcheu District Warehouse | Ntcheu District | Warehouse | YES | 01/01/2016 | YES |
Understanding Associated Facilities and Programs Supported
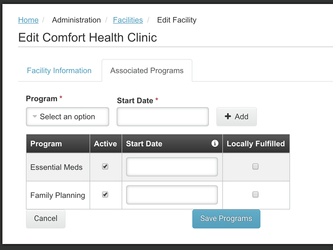
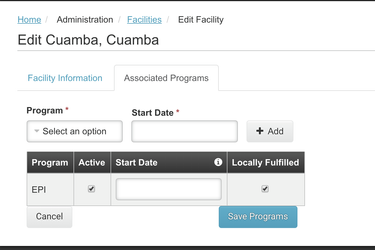
Once facilities are set up you must assign the programs and details associated with each facility. Facilities in OpenLMIS can support one to many programs that are available at one to many facilities (with some variations). Assigning a program to a facility qualifies the program and its related orderables to be used in the requisitioning process for that facility. A facility must be assigned a program that is active, as well as a valid start date for that program in order to be used. Designating a program to be fulfilled locally is also a part of the set up of facilities and associated programs.
Associate Facilities and Programs
Example:
| Facility Code (required) | Program Code (required) | Program is Active (required) | Start Date (optional) | Locally Fulfilled (optional) |
|---|---|---|---|---|
| HC01 | Family Planning | YES | FALSE | |
| HC01 | Essential Meds | YES | FALSE | |
| N003 | EPI | YES | TRUE |
Example of facility that is fulfilled externally:
Example of facility that is fulfilled locally:
OpenLMIS comes with a built-in facility registry that is compatible with a subset of the Mobile Care Services Delivery (mCSD) profile of the Fast Healthcare Interoperability Resources (FHIR) specification. This is for interoperability with other facility registries in order to easily synchronize data as it is managed.
To support the mCSD profile, OpenLMIS exposes facilities and their geographic data as FHIR Locations. The system also handles facility updates by automatically syncing changes to the corresponding locations. As long as the built-in FHIR server is running, no additional configuration is necessary.
The purpose of Facility Type Approved Products allows you to segment orderables by facility type. Although a program supports a specific list of orderables, different facilities may not have the capacity to support providing the orderables. This is why you would want to segment orderables by facility type. Each facility that performs duties related to the requisition process must be set up with their Facility Type Approved Products.
Setting up Facility Type Approved Products per Orderable
![]() It is important to correctly configure the Max Periods of Stock per Product because it is included in the calculation for the Dispensing Units and affects the Total Cost on every requisition. (This is detailed more in the R&R Template section below.)
It is important to correctly configure the Max Periods of Stock per Product because it is included in the calculation for the Dispensing Units and affects the Total Cost on every requisition. (This is detailed more in the R&R Template section below.)
| facilityType (required) | orderable (required) | program (required) | maxPeriodsOfStock (required) | minPeriodsOfStock (optional) | emergencyOrderPoint (optional) |
|---|---|---|---|---|---|
| heac | TB000100 | em | 3 | 3 | 1.5 |
| heac | TB000100 | tb | 3 | 3 | 1.5 |
| DHO | TB000100 | em | 3 | 3 | 1.5 |
| DHO | TB000100 | tb | 3 | 3 | 1.5 |
Now that you have set up your facilities you are ready to set up the objects that enable the workflows in OpenLMIS.
Setup Ideal Stock Amounts
Understanding Ideal Stock Amounts
The Ideal Stock Amount is a yearly estimate of the “target” number of doses of a vaccine you should have based off of your population served (i.e. catchment population). This model for estimating the number of vaccine doses you need is irrespective of vial size, packaging, manufacturer, etc. so that you focus on a single number of doses that you should have at any given time. For more rural service delivery points, this time is typically the number of doses you should have in a year, divided by 12 months with the idea that your refrigerator can only hold up to about a month's worth of vaccines at a time. The Ideal Stock Amount (ISA) can be used in reordering calculations for OpenLMIS for a vaccine program.
Setting up ISA by Facility, Commodity Type and Period
Ideal Stock Amounts (ISAs) are configured by facility code, commodity type, and period. An initial load of ISAs is done by uploading a .csv file with the following columns:
| Facility code (required) | Commodity Type (required) | Period (required) | ISA (optional) |
|---|---|---|---|
| N030 | UNSPSC|51201621 | SCH001|Mar2018 | 8900 |
| N080 | UNSPSC|51201647 | SCH001|Dec2017 | 1000 |
![]() Any updates to the ISA can be done by exporting the ISAs into a csv file and completing the steps listed on Administration > Ideal Stock Amounts > Manage Ideal Stock Amounts page.
Any updates to the ISA can be done by exporting the ISAs into a csv file and completing the steps listed on Administration > Ideal Stock Amounts > Manage Ideal Stock Amounts page.
Stock Management is the process of managing stock by recording physical inventory utilizing stock cards, and using reason categories to record and track stock movements. In the Stock Management screens as well as in the Requisition form, storeroom managers need to record the reason for each stock event, e.g. adjustment, receive or issue. First, you must configure adjustment reasons for each stock event.
OpenLMIS provides a page for the system administrator to manage the reason list. There are reason categories ('Transfer', 'Adjustment', and 'Aggregation') and reason types ('Debit' and 'Credit').
A reason can allow free text. By allowing a reason to support free text, a store manager can input a description to this reason to provide more detail about the reason. For an example, a reason labeled 'Other' is a 'transfer' category and 'credit' type reason. When the storeroom manager chooses this reason for a receive stock event then the storeroom manager can input description (e.g. NGO-VR) to explain the reason 'Other'.
| Category | Reason Type: Credit | Reason Type: Debit |
|---|---|---|
| Transfer | Receive | Issue |
| Adjustment | Positive adjustment | Negative adjustment |
| Aggregation | Unpacked from kit | Unpack kit |
Starting with version 3.2.1, you can select whether reason for Program and Facility Type should be shown or hidden. The default for new reasons is 'Show', but if you un-check the Show setting, then that reason will not be displayed in the Requisition form Total Losses and Adjustments and also will not appear in the Stock Management adjustments form. Introduced in version 3.2.0, the requisition columns for Beginning Balance, Received Quantity, and Consumed Quantity now get mapped to stock management reasons. Those reasons are first configured as Valid Reason Assignments in the stock service and are visible in the Total Losses and Adjustments modal. The specific 4 reasons which are configured in the .ENV file are: CONSUMED, RECEIPTS, BEGINNING_BALANCE_EXCESS and BEGINNING_BALANCE_INSUFFICIENCY. For Requisitions to be approved, there must be 4 reasons configured in the Requisition service, and those 4 reasons must be valid reasons for all Program and Facility Types using Requisitions. These 4 reasons should be set to hidden (un-check Show), and the Requisition service will still be able to use them even though they are not shown on the list when end-users select reasons. See an Example request in Postman for Facility Type Health Center, Program Family Planning from demo data and CONSUMED Reason:
|
When creating a new Reason the following fields are required or optional:
Example:
| Name (required) | Category (required) | Type (required) | Allow Free Text (optional) | Tags (optional) | Program (required) | Facility Type (required) | Show (required) |
|---|---|---|---|---|---|---|---|
| Receipts | Adjustment | Credit | FALSE | received adjustment |
|
| |
| Damage | Adjustment | Debit | FALSE | adjustment debit |
|
| TRUE |
| Cold Chain Failure | Adjustment | Debit | FALSE |
|
| TRUE |
![]() You can select multiple programs and facility types for each reason to be valid/enabled at. Sharing Reasons across programs is recommended for consistency of reporting. We do not recommend making repeated/duplicate copies of the same reason for the use by different programs unless there is a difference in meaning or use for the different programs.
You can select multiple programs and facility types for each reason to be valid/enabled at. Sharing Reasons across programs is recommended for consistency of reporting. We do not recommend making repeated/duplicate copies of the same reason for the use by different programs unless there is a difference in meaning or use for the different programs.
Process
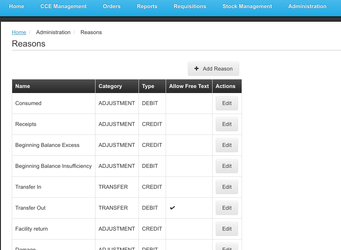
2. Click 'Add Reasons':
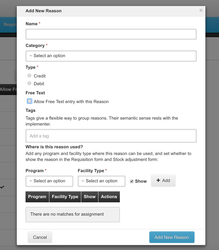
3. Fill in required fields to create a new reason, including adding all Programs, corresponding Facility Types for which the reason should be valid/enabled and set whether this assignment should be shown or hidden:
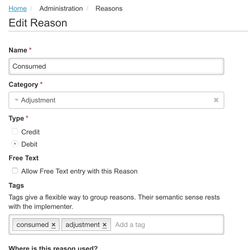
5. Stock Reason Tags are used to group reasons. For Stock-Based requisitions, configuring the stock reason tags will enable the system to group stock events to calculate the required stock card columns. This is defined more in the Requisition Template section of the Configuration Guide.
6. After you click Add New Reasons, the Reason is added and the updated list is displayed:
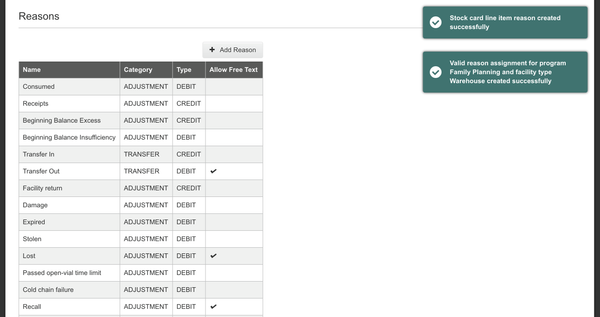
Once added, the new reasons will immediately be available in the Stock Management screens based on Program and Facility Type. The reasons will be applied to new Requisitions when they are initiated. Requisitions use these reasons for the "Total Losses and Adjustments" field that is collected for each product on the requisition form.
![]() Requisitions initiated prior to the addition of new reasons, will use the reason list that was in place at the time they were initiated.
Requisitions initiated prior to the addition of new reasons, will use the reason list that was in place at the time they were initiated.
| In version 3.6 we introduced support for kits in Stock Management. A kit is delivered and received into inventory as any other product would be. After the delivery the recipient's stock is incremented as a kit (not for the constituent parts). After the kit is received into inventory, optionally the kit might be unpacked. If unpacked then the constituent parts of the kit are added into inventory, and the kit is decremented from inventory. When a kit is unpacked, it is considered as consumed, and is not associated with the consumption of its constituent parts. |
Understanding new organizations
The Stock management service allows the system administrator to create new organizations in the system to be the source/destination for the receive/issue stock event. As of OpenLMIS 3.2.0, Organizations are only used in the Stock Management screens, but not used within the Requisition form. Adjustments recorded in the Requisition form do not have source/destination information.
New created organizations are free-text allowed default setting. Meaning, all the added organizations support free-text but this free-text description field is optional and user can leave it blank.
Process:
Go to the swagger API - https://test.openlmis.org/stockmanagement/docs/#!/default/post_api_organizations
Find the below API and send a post request in order to create new organizations.
There is another API to get the full set of all created organizations:
The Stock management service allows the system administrator to assign facilities or organizations as the destination of an issue stock event for a specific program and facility type combination.
Process:
Go to the swagger API - https://test.openlmis.org/stockmanagement/docs/#!/default/post_api_validDestinations
Find the below API and send a post request in order to assign organizations/facilities to a facility type and program.
Among those fields in the request body, there are three mandatory fields:
facilityTypeId - determines which facility type is assigned to
referenceId - is the ID of a facility or an organization.
programId - determines which program is assigned to
Moreover, we also provides the API to remove the assignment.
Go to the swagger API - https://test.openlmis.org/stockmanagement/docs/#!/default/delete_api_validDestinations_id
Find the below API and send a request to call this API in order to remove the assignment of organizations/facilities for a facility type and program.
In order to present the example configuration for valid destinations and valid sources, the exemplar facility types and facility codes are presented below:
| facilityType | facilityTypeCode | facilityCode |
|---|---|---|
| Clinic | privC | FAC01 |
| Private Hospital | privH | FAC02 |
| Warehouse | warehouse | FAC03 |
| Clinic | privC | FAC04 |
| Private Hospital | privH | FAC05 |
| Warehouse | warehouse | FAC06 |
In this example there are three facility types (Clinic, Private Hospital and Warehouse) and six facilities of each type.
Valid Destinations table, apart from program code, consists of facilityTypeCode and destination columns.
In facilityTypeCode column there should be all codes of facility types which are able to supply other facilities. In destination column there should be facility codes of facilities which are supplied by a facility of type indicated in facilityTypeCode column.
The Valid Destinations table for these configuration is created below:
| facilityTypeCode | destination |
|---|---|
| warehouse | FAC01 |
| warehouse | FAC02 |
| warehouse | FAC04 |
| warehouse | FAC05 |
| privC | FAC01 |
| privC | FAC04 |
| privH | FAC02 |
| privH | FAC05 |
Valid Sources table, apart from program code, consists of facilityTypeCode and facilityCode/organizationName.
In facilityTypeCode column there should be all codes of facility types which are to be supplied by warehouses or organizations.
In facilityCode column there should be codes of facilities which supply other facilities. Most often it will be a warehouse.
In organizationName column there should be a name of a supplying organization if there is such.
The Valid Sources table for these configuration is created below:
| facilityTypeCode | facilityCode | organizationName |
|---|---|---|
| privC | FAC03 | |
| privH | FAC03 | |
| privC | FAC06 | |
| privH | FAC06 |
In the table there are warehouses’ facility codes (FAC03, FAC06) in the facilityCode column. It means that these facilities supply facilities of privC and privH facility types.
Understanding Supervisory Nodes, Requisition Groups, and Supply Lines
The requisition workflow associates processing schedules, programs and facilities via the concept of a Requisition Group. A Requisition Group is a way to manage the replenishment process for multiple facilities or approval hierarchies. At least one Requisition Group and one Supervisory Node must be created and associated with each other in order for the requisition workflow to function. Requisition Groups can have: one to many facilities, one to many programs, one to many schedules. There are a few factors that determine if more than one Requisition Group need to be set up and they are: if multiple programs require different tiers of approvals (one to many Supervisory Node associations), and if multiple programs require a different order of approvals.
A supervisory node is not a physical entity or location, but rather a sort of logical control point through which requisitions are routed for review and approval, and must always exist for a requisition to be approved. Supervisory nodes are thus a mechanism that OpenLMIS uses to control the workflow of requisitions. Typically, a user would be given review-and-approval rights for requisitions passing through a particular supervisory node, and these rights could be assigned for one program or multiple programs that the requisition group handles. A Supervisory Node is required for every Requisition Group so that the association creates an approval hierarchy for the requisition workflow. Only one Supervisory Node can be assigned to a Requisition Group, so if there are multiple Requisition Groups there must be more than one Supervisory Node. Also if the approval hierarchy requires an approver above the first Supervisory Node, then a parent Supervisory node must be created (Supervisory Node tree). Creating a Supervisory Node doesn't automatically enable approval capabilities until it has been associated with a user and a program.
Supervisory nodes are also used to manage and assign Supervision type rights for individual users of the system. Supervision Rights are used in a variety of situations where we'd like to give a user some capabilities within an administrative hierarchy, typically to some aspect of the supply chain focused at Facilities, divided by Program.

Supply lines are the mechanism that OpenLMIS uses to route orders to the correct supplying facility, to be packed and shipped. Supply lines are specified on a per-program basis. Orders for all programs can be routed to the same supplying facility, or can be routed selectively, based on how your supply chain operations are structured. Orders for most programs might be filled out of a regional or national warehouse, while orders for a vaccination program might be filled out of a different facility which has adequate cold-storage capacity.
Setting up Supervisory Nodes
For each Supervisory Node, a Supervisory Node code, Supervisory Node name, Description, Parent Node, and Facility Code can be defined but not all fields are required. The Supervisory Node Code is a required field. The code is an alphanumeric identifier that is the shorthand description for the Supervisory Node and is used when CSV uploads are part of the setup process (referenced in Step #3). The Supervisory Node name is also required, and is the common name for the Supervisory Node that will be visible to the administrator when completing assignments so the name should be meaningful for the organization. The description is an optional field that can further assist in identifying the Supervisory Node purpose or responsibilities. The Parent Node is only required if the Supervisory Node needs a higher level approval to complete the approval process. The Facility Code is the facility associated with the Supervisory Node.
Example:
| Supervisory Node Code (required) | Supervisory Node Name (required) | Description (optional) | Parent Node (optional) | Facility Code (required) |
|---|---|---|---|---|
| SN1 | FP Approval point | Family Planning approval point | HC01 | |
| SN1.1 | FP Approval sub point | Family Planning approval sub point | SN1 | DH01 |
| SN-CUAMBA-DIST | Cuamba district approval point (EPI) | Niassa province approval point (EPI) | D001 - Depósito Distrital Cuamba |
Setting up Requisition Groups
A requisition group is a concept that is used to tie facilities together to drive the approval process and allows for management of replenishment processes. For each Requisition Group, a Requisition Group Code, name, Supervisory Node, and description must be defined but not all fields are required. The Requisition Group Code is a shorthand for identifying the requisition group, and is used in subsequent CSV uploads of related data. The Requisition Group Name is common name for group, and will appear on various admin screens for managing requisition groups and members. It is recommended that the name be something meaningful to your organization's operations. The Supervisory Node identifies the Supervisory Node to which all requisitions from this group's member facilities will be routed. The description is for any additional descriptive information that will be helpful when setting up or managing requisition groups and members.
Example:
| Requisition Group Code (required) | Requisition Group Name (required) | Supervisory Node Code (required) | Description (optional) |
|---|---|---|---|
| RGFP1 | RG Family Planning 1 | SN1 | Supports facilities running the family planning program on a monthly schedule |
| RGEM1 | RG Essential Meds 1 | SN2 | Supports facilities running the essential meds program |
| RGFP2 | RG Family Planning 2 | SN1.1 | Supports facilities running the family planning program on a quarterly schedule |
| RGEPI1 | RG EPI 1 (districts) | SN-NIASSA-PROV/Niassa province approval point | Niassa province approval point (EPI) |
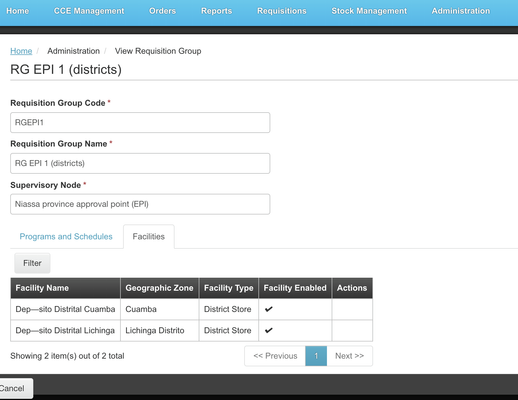
Associating Requisition Group Programs and Schedules
Example:
| Requisition Group Code (required) | Program (required) | Processing Schedule (required) | Direct Delivery (required) | Drop off Facility (optional) |
|---|---|---|---|---|
| RGPS1 | EM | MPS | TRUE | |
| RGPS2 | HIV | MPS | TRUE |
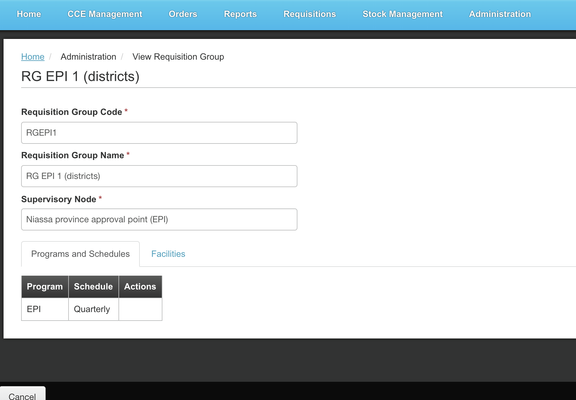
Setting up Supply Lines
Supply lines are the mechanism that OpenLMIS uses to route orders to the correct warehouse or facility, to be packed and shipped. Supply lines are specified on a per-program basis. Orders for all programs can be routed to the same warehouse or facility, or can be routed selectively, based on how your supply chain operations are structured. Orders for most programs might be fulfilled by a regional or national warehouse, while orders for a vaccination program might be fulfilled from a local facility which has adequate cold-storage capacity.
Supply lines for external fulfillment are specified for supervisory nodes that are at the top node of their supervisory hierarchy, because this is the point from which the orders are released to a warehouse to be filled. For local fulfillment, the supply lines may be defined at an intermediary level in the supervisory node hierarchy. Then the approval at that intermediary level is considered a final approval that will create an order to fulfill. Each supervisory node at the top of their hierarchy must have a supply line specified for each program that is supported by the requisition groups under its supervision. This includes both requisition groups under its immediate supervision, as a supervisory node only has one requisition group it directly supervises.
Example:
| Program (required) | Supervisory Node (required) | Supplying Facility (required) | Description (optional) |
|---|---|---|---|
| FP | SN1 | WH01 | Ntcheu District Warehouse supplies Family Planning |
| Essential Meds | SN2 | WH02 | Balaka District Warehouse supplies Essential Meds |
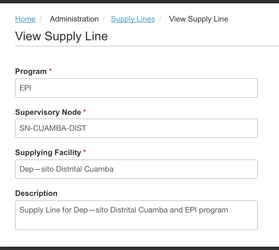
In the Supply Lines list view, you are able to view the facilities that the Supervisory Node supervises by hovering your mouse over the Supervisory Node column.
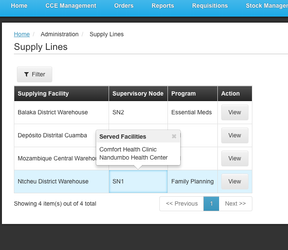
![]() Make sure the Supply Line is configured with the correct Supervisory Node. If a Supply Line is configured to a child Supervisory Node then the facility associated with that child node will not need a parent node approval. (This configuration may be desired for local fulfillment.)
Make sure the Supply Line is configured with the correct Supervisory Node. If a Supply Line is configured to a child Supervisory Node then the facility associated with that child node will not need a parent node approval. (This configuration may be desired for local fulfillment.)
Setting up Supply Partners (in progress for 3.5 updates)
(Add explanation of multiple supply partners and the need, as well as the administrator configuration screens here Nikodem Graczewski (Unlicensed))

Link to Supervisory Hierarchy diagram
Understanding Users, Roles, and Rights
A user in OpenLMIS is a person who accesses the system. A user is assigned a role(s) to control their access rights within the system. Role assignment is critical for users to have the appropriate access within the system. A Role is a combination of one or more rights available in OpenLMIS. Rights relate to individual actions that a user can take, such as view a report, or create a requisition. There are four role types already defined in the system: Supervision, Fulfillment, Reporting, and Administration.
Setting up users requires gathering basic user information such as first and last name, email (if they have one), and what their role and access requirements are within the system.
Example:
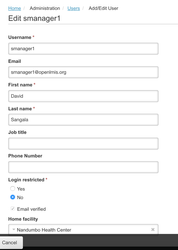
There are four role types already defined in the system that you can utilize to create roles that fit your organization's needs (Supervision, Fulfillment, Reporting, and Administration). All required Roles must be set up to ensure a role exists to assign to a user. There are three steps to setting up roles within the predefined role types: select the role type, enter role details, and select rights specific to the role.
Example:
| Role Name (required) | Description (required) | Rights (at least one selection is required) |
|---|---|---|
| Delivery Approver | Can manage proof of deliveries |
|
| District Storeroom Manager | Can view and approve requisitions |
|
| Storeroom Manager | Can create, view, and delete requisition |
|
Once Users and Roles setup is complete, you must now assign roles to the users.
Example: Supervision Role assignment for a user
Home Facility Supervision Role
![]() For removal, if a user has an assigned Home Facility and associated Program and roles with the Home Facility, you are able to remove all associations by clicking the "x" in the Home Facility on the Edit User page. If you choose to proceed with this and select "Keep Roles", then the Home Facility is removed from any Supervision type roles that were assigned to that Home Facility, but the Roles are still assigned to the user. Keeping the roles may be helpful if a user's home facility has changed, but their roles at their home facility are the same. Or you may choose to "Remove all roles" which will remove the roles assigned, and you will need to assign new roles as needed.
For removal, if a user has an assigned Home Facility and associated Program and roles with the Home Facility, you are able to remove all associations by clicking the "x" in the Home Facility on the Edit User page. If you choose to proceed with this and select "Keep Roles", then the Home Facility is removed from any Supervision type roles that were assigned to that Home Facility, but the Roles are still assigned to the user. Keeping the roles may be helpful if a user's home facility has changed, but their roles at their home facility are the same. Or you may choose to "Remove all roles" which will remove the roles assigned, and you will need to assign new roles as needed.
Also, when the administrator navigates to the Roles for the edited user after selecting "Keep Roles" then the user's roles will show an error icon on the Roles page.

See the example below of a user with a missing home facility but there are roles assigned:
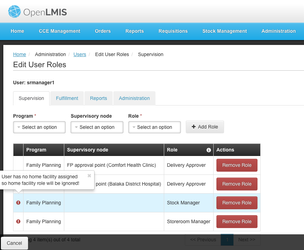
Supervision Role
This example below shows that the administrator has assigned the user dsrmanager with the following roles:
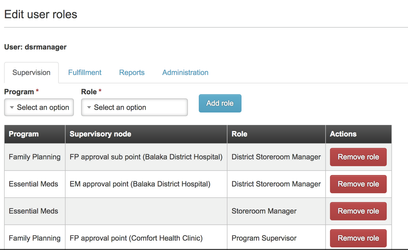
The assignments mean that the user dsrmanager can complete the following:
![]() Users with approval type responsibilities must be assigned the Program, Supervisory Node, and Role for the facilities they supervise as described here. If a user is having trouble viewing requisitions to approve, or viewing requisitions associated with their facility, then the assignments will need to be updated in their user roles section above.
Users with approval type responsibilities must be assigned the Program, Supervisory Node, and Role for the facilities they supervise as described here. If a user is having trouble viewing requisitions to approve, or viewing requisitions associated with their facility, then the assignments will need to be updated in their user roles section above.
Example Supervision Role assignment for Stock Management user
By default, there will be two roles set up: Stock Manager and Stock Viewer.
This example below shows the user srmanager2 has the Stock Manager role for their Home Facility.
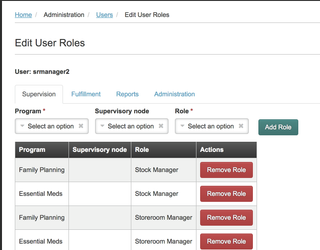
The assignment means that the user srmanager2 can complete the following:
Example: Supervision Role assignment for Fulfillment user
Delivery Approver role includes two rights: View proofs of delivery and Manage proofs of delivery.
This example below shows the user divo1 has the Delivery Approver role for the Cuamba district approval point (EPI) Supervisory node.
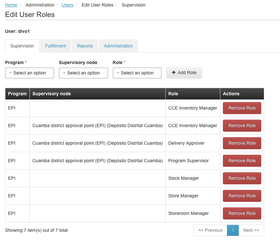
This Delivery Approver role assignment means that the user divo1 can complete the following:
Example: Fulfillment Role assignment to a user
This example shows that the user wclerk1 has the Warehouse Clerk Role for the Ntcheu District Warehouse.
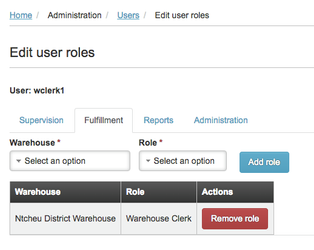
The assignment means that the user wclerk1 can complete the following:
Example: Reporting Role assignment to a user
This example shows that the user administrator has the Reporting Personnel role.
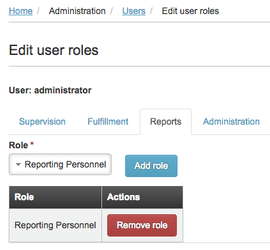
The assignment means that the user administrator can complete the following:
Example: Administration Role assignment to a user
This example shows that the user admin has the System Administrator role.
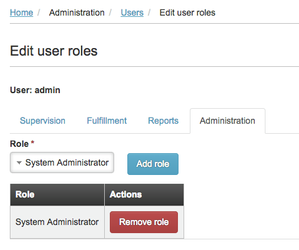
The assignment means that the user administrator can complete the following:
![]() The administrator can view all roles that exist in OpenLMIS and the number of users assigned to each role by going to Administration > Roles.
The administrator can view all roles that exist in OpenLMIS and the number of users assigned to each role by going to Administration > Roles.
OpenLMIS supports automated notifications for workflows related to requisition, fulfillment, stock management, and cold chain equipment. These notifications are informational or require the user to log in and take action. All of these notifications are automatically configured to notify a user if they have assigned supervisory type roles for each component. Users have the ability to opt-out of these notifications during the user setup process, or on their own through their user profile page.
Allowing notifications or opting out of notifications on the user page is shown below. By selecting the Allow notifications checkbox a user will receive all notifications, and if they unselect the checkbox then they will not receive notifications. The Allow Notifications checkbox is selected by default.
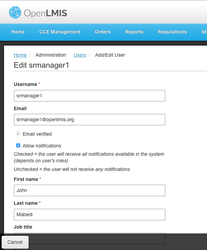
Regardless of their role assignment or opting out of notifications, all users will receive the reset password notification and emergency requisition notifications.
Example of notifications
Enabling automated email notifications for users is done by assigning the role and supervisory node. For Stock Management notifications, a Role must have the Edit stock inventories right. The admin must then assign the Role and the facility's Supervisory Node to the user, so that they will receive email notifications related to that facility. For Cold Chain Equipment notifications, a Role must have the Edit Cold Chain Equipment right. The admin must then assign the Role and the facility's Supervisory Node to the user, so that they will receive email notifications related to that facility.
Example of Stock Management assignment:
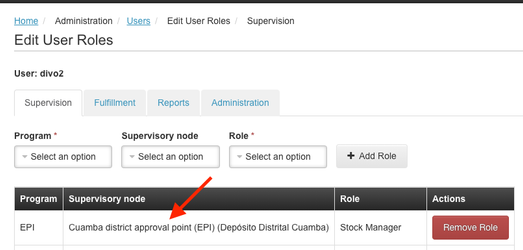
Example of CCE assignment:
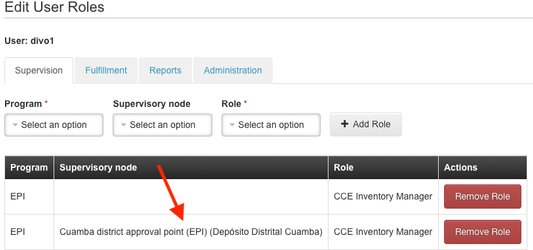
![]() If a Supervisory Node is not assigned, then the user will not receive email notifications!
If a Supervisory Node is not assigned, then the user will not receive email notifications!
Now you have completed the set up of Users, Roles, Rights, and their assignments within OpenLMIS.
The R&R form is the Requisition & Report form that is used by storeroom managers to input stock information and request new stock. The R&R Template is the Requisition & Report template an administrator or implementer can configure that modifies the properties of the R&R form. R&R forms can be customized for each program and facility type, and there must be at least one requisition template per program. The requisition template customization includes defining which fields or data elements will be entered by the user, the display names for all fields, how certain calculations and validations are performed, the source of data for the columns, and the overall layout of the template.
A regular requisition is the standard type of requisition that users will utilize to complete their requisition workflow. In order to be fulfilled, the regular requisition must be completed during the normal processing schedule. When logging in to start an R&R form, regular will be the default selection for the user.
An emergency requisition is a type of requisition that is not limited to one per processing schedule. A user can enter many emergency requisitions within a processing period. For example, if a user's requisition has already been approved and is in the last stages of the requisition workflow, they can enter an emergency to request additional stock. The requisition template for an emergency requisition has a limited amount of columns available and can not be changed using the process detailed below.
A regular requisition is considered a Stock-based requisition when the "Enable Stock on Hand to populate from stock cards" is selected, and the source for column's data has been changed from user input to stock cards. A stock-based requisition also requires the program to use Stock Management so that the data is populated from the program's stock cards.
Column Definitions
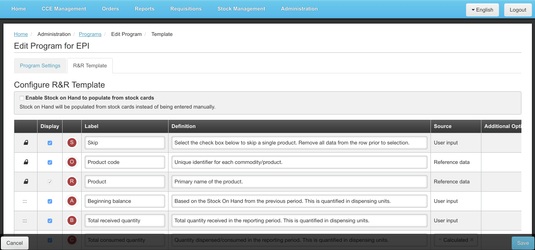
Icons | Explanation |
|---|---|
| Lock icon: When these fields are selected to display, they must be in the order that they appear on this page as the first, second, and third columns to define in the requisition template. They cannot be rearranged to appear in a different order. | |
| This icon identifies any template column that can be reordered to appear in the R&R form. Reordering columns can be done by clicking on a row and moving it up or down. This will change the order that the columns are displayed in the R&Rs. | |
| Display column: When the display box is checked, then the field will show in the R&R. When it is unchecked, it will not display. There are template validations that check whether required fields are displayed before a requisition template can be saved. | |
| Letter icons: The letters inside the red circles are tags to identify each column and align to the Template Calculations. These icons aren't visible to general users, but are provided to help administrators follow how related columns are calculated. | |
| Enable Stock on Hand to populate from stock cards checkbox is used when Stock Management service is active. Once this checkbox is selected the requisition template columns for Beginning Balance, Total Received Quantity, Total Consumed Quantity, Total Losses & Adjustments, and Total Stockout Days are disabled and will no longer display on the requisition form. The Stock on Hand will be populated by stock cards and is uneditable by the user completing the requisition form. |
| Label column: The text in this field is the display name for this column in the R&R and is a free text field. All Labels can be edited to match a specific program. A suggestion is to abbreviate the labels so the R&R form appears more compact for the user. | |
| Definition column: The text in this field should explain to the user what the Label is and how it is calculated or defined to assist the person creating or reviewing the R&R. When the user is completing the R&R form, they can hover over this column label to better understand what it's used for in the R&R form. This is helpful if the label has been abbreviated to shorten the R&R form. | |
Source column: The source is either Reference Data, User Input, Calculated, or Stock Cards.
| |
| Additional Options | Additional Options: These are additional options associated with the Source column. Tags, hiding skipped line items, and new patient count are some examples of additional options configurable in this template column. |
Tags
| Tags are only available to select if :
|
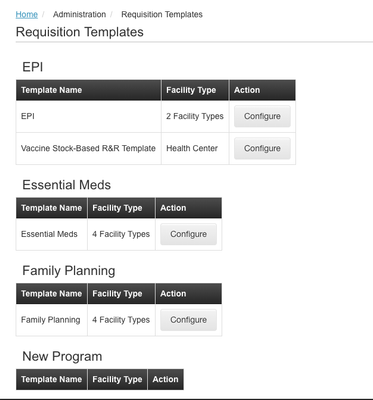
OpenLMIS supports multiple requisition templates per program, per facility type. This configuration is helpful when a health facility may be required to report more data than a district or regional store. Once a new program is created and the facilities are associated with the new program, then the requisition template is ready to configure.
The new requisition template must include the following fields:
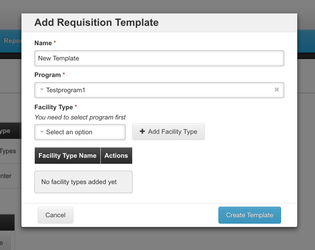
After clicking Create Template, the new requisition template is populated with all available requisition template columns by default.
Before editing column descriptions and the order of each column in the requisition template, you will need to understand the dependencies and calculations of each field that is detailed below.
Within the R&R template there are fields that have system generated calculations or options to change the source. Understanding how these calculations affect the workflow for each R&R template will assist in determining which sources should be used for each program.
*Are required fields, however implementers can choose which are user input or calculated. This requirement began at version 3.2.0.
Field Label | Letter Icon | Business Definition | Calculation (Columns are identified by letter icons) | Source/Options | Template Save Validations | Allows tags | Regular Requisition Form Validations | Emergency Requisition Form Validations | Stock- Based Requisition Form Validations | Additional Options |
|---|---|---|---|---|---|---|---|---|---|---|
| Skip | S | Allows user to skip R&R for a product line item and hide skipped line items in the R&R form | Not Applicable | Not Applicable |
| NO |
| Not Applicable |
|
|
| Product Code | O | Unique identifier for each commodity/product. | Not Applicable | Reference Data |
| NO | ||||
| Product | R* | Primary name of the product. | Not Applicable | Reference Data |
| NO | ||||
| Beginning Balance | A | Based on the Stock On Hand from the previous period. This is quantified in dispensing units. | = SOH from the previous period's requisition | System Generated |
| NO |
|
|
| |
| Total Received Quantity | B* | Total quantity received in the reporting period. This is quantified in dispensing units. | User Input |
| YES |
|
|
| ||
| Total Consumed Quantity | C* | Quantity dispensed/consumed in the reporting period. This is quantified in dispensing units. | If calculated, C = A + B +/- D - E | User Input or Calculated |
| YES |
|
|
| |
| Total Losses & Adjustments | D* | All kind of losses/adjustments made at the facility. | User Input (Source is list of Adjustment Reasons configured in Stock Management) |
| NO |
|
|
| ||
| Stock on Hand | E* | Physical count of stock on hand, as of the requisition's processing period end date. This is quantified in dispensing units. | A + B (+/-) D - C | Calculated, User Input, or Stock Cards |
| NO |
| Column not available |
| |
| Calculated Order Quantity | I | H - E | Calculated |
| NO |
| Column not available | Updates to this column validation must be added for 3.5 Sebastian Brudziński | ||
| Requested quantity | J | Requested override of calculated order quantity. This is quantified in dispensing units. | User input |
| NO |
|
|
| ||
| Requested Quantity Explanation | W | Explanation of the request for a quantity other than the calculated order quantity. | User Input |
| NO |
|
| |||
| Number of New Patients | F | Number of New patients data | User Input |
| NO |
| Column not available | |||
| Approved Quantity | K | Final approved quantity. This is quantified in dispensing units. | User Input |
| NO |
|
|
| ||
| Remarks | L | Any additional remarks | User Input |
| NO |
|
|
| ||
| Total | Y | Total of beginning balance and quantity received. | A + B | Calculated |
| NO | Column not available |
| ||
| Total Stock out Days | X | Total number of days facility was out of stock. | User Input or Stock Cards |
| NO |
| Column not available |
| ||
| Adjusted Consumption | N | Total consumed quantity after adjusting for stockout days. Quantified in dispensing units. | Roundup(C * (M * 30) / ((M * 30) - X ))) M = Number of periods to average (this is identified in the additional options column for P) | Calculated |
| NO | Column not available | |||
| Averaged Consumption | P | Average consumption over a specified number of periods/months. Quantified in dispensing units. | AMC (P) = (Nt0 + Nt-1 + Nt-2) / 3 Last "t" periods averaged (includes the reporting period being input) | Calculated or Stock Cards |
| NO |
| Updates to this column validation must be added for 3.5 Sebastian Brudziński | ||
| Maximum Stock Quantity | H | Maximum stock calculated based on consumption and max stock amounts. Quantified in dispensing units. | P * MaxPeriodStock | Calculated |
| NO | Column not available |
| ||
| Price Per Pack | T | Price per pack. Will be blank if price is not defined. | ReferenceData |
| NO | Column not available |
| |||
| Packs to Ship | V | Total packs to ship based on pack size and applying rounding rules | J / U | Calculated |
| NO |
| Column not available |
| |
| Total Cost | Q | Total cost of the product based on quantity requested. Will be blank if price is not defined. | V * T | Calculated |
| NO |
|
| ||
| Dispensing Unit | U | Dispensing unit for this product. | ReferenceData |
| NO |
|
| |||
| Ideal Stock Amount | G | The Ideal Stock Amount is the target quantity for a specific commodity type, facility, and period. | ReferenceData |
| NO |
| ||||
| Additional Quantity Required | Z | Additional quantity needed for New Patients or other factors such as seasonality Adjusted Consumption (N)+ Additional Quantity Required (Z) |
|
Once a template has been created and is in use, it can still be modified and updated to better support the programs and users. There are some important considerations you should know before making changes to the template:
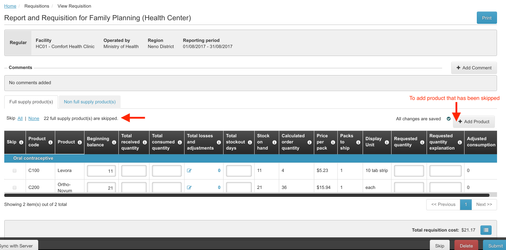
The implementer or administrator has the ability to allow hiding products that have been skipped in requisitions. This is a helpful configuration that shortens a requisition form when the same products are frequently skipped.
In the requisition template, in the Skip column, select from the Additional Options dropdown "Hide Skipped Line items".
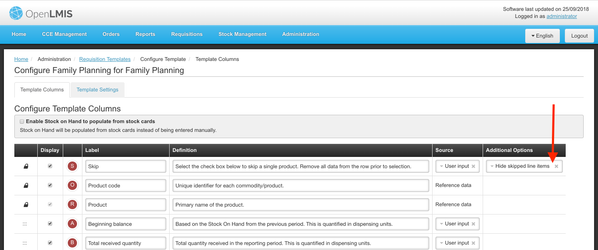
Once skipped line items has been configured in the requisition template, the user will no longer see skipped products in their requisition form. They can choose to add products that are skipped back into the requisition form if necessary.
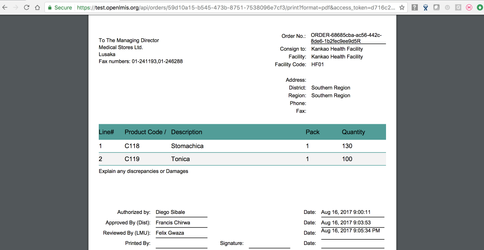
UI Fields | Displayed in PDF or Orders UI | Labels in Order File | Source |
|---|---|---|---|
| Order Number/Code | PDF, UI | Order No | Order Number Prefix (if any) + Program Code (if set to True) + R&R type suffix (if set to True) |
| Order Status | UI | ||
| Program | UI | ||
| Date Created | UI | ||
| Date Last Updated | UI | ||
| Last Updater | UI | ||
| Requesting Facility Name | PDF, UI | ||
| Requesting Facility Type | PDF, UI | ||
| Requesting Facility Code | PDF, UI | ||
| Order Emergency Flag | UI | ||
| Product Code | PDF, UI | Product Code | Product Code |
| Description | PDF, UI | Product Name | |
| Ordered Quantity | PDF, UI | Ordered Quantity | 1 is the Approved Quantity (ApprovedOrderQuantity) and 2 the Requested/CalculatedOrderQuanity (OrderedQuantity), Displayed in Packs |
| Dispensing Units | PDF, UI | Dispensing Units |
Order file is generate with name ‘O’ + order number.csv
In order to use the CCE Management features in OpenLMIS, you will need to first set up the CCE Catalog. The catalog is a list of CCE devices stored in the back end, along with other relevant information about the equipment. The catalog provides a list of devices that a program user can select from when they are adding specific device information to a facility. The catalog is created in the system through uploading a CSV. This CSV must be in the correct format, otherwise the system will not accept it as a valid catalog. More information on configuring the CSV CCE Catalog is available in the "Configufin Cold Chain Equipment catalog" section in Step 3: Configuration via CSV uploads.
The catalog template CSV is already loaded into the system as the default CCE catalog. You will need to download the template so that you can add your own devices to the CSV and upload them to be visible to users in the system.
To download the catalog template CSV, go to CCE Management > CCE Catalog. Click "Download current catalog." This will download a CSV file that can be used as a template for your CCE Catalog. If you already have an Excel or CSV file of a CCE Catalog that you'd like to use, you must transfer the data into the OpenLMIS CCE Catalog template. You must retain the same column headers from the downloaded catalog template. If you delete or change any column headers in the template, you will not be able to upload the CSV as your new CCE Catalog.
OpenLMIS integrates with Google Analytics in order to provide insights into platform traffic and user behaviour. In order to benefit from this integration, start with creating a Google Analytics account here: https://analytics.google.com/analytics/web. Once that's done, you should find your Google Analytics tracking code. Go to Admin settings on Google Analytics and find section called "Tracking Info". This section will show your unique Tracking ID as shown below.
![]()
The Tracking ID needs to be provided to your UI project (equivalent of https://github.com/OpenLMIS/openlmis-reference-ui) during build time. It can be achieved in two ways:
Once built and deployed to your server, the tracking should be in place. and you should be able to see the metrics in the Google Analytics account you created. For any issues with Google Analytics, you can check their help center: https://support.google.com/analytics
In addition to the regular metrics in place, the OpenLMIS instance will also send button click events to the Google Analytics. You can also implement and send your own events. The UI in the offline mode will collect the page views and events and send them as soon as the instance is back online.
You can find CSV templates, containing only headers, to upload CCE data here. In order to create Catalog Item with only mandatory fields use mandatoryFields.csv. Template with all fields is allFields.csv. Of course you can create your own template that contains mandatory fields and some of the non-mandatory fields. The possible values for fields are:
ELECTRIC
SOLARGASOLINENOT_APPLICABLEDate of prequal: 4-digit year
For all fields you need to keep rules. Mandatory fields are bolded.
There will need to be an identifier for each item. If there is a PQS code, use that; otherwise, use a combination of make type and model as the unique identifier.
OpenLMIS includes a set of four reports that will help you verify the system has configured correctly. The reports are listed below. You must be logged in with a user account that has been assigned a role which includes the rights to run each of these reports.
1. Facilities Missing a Create Requisition Role: This report will identify any facility where a program is operating but there is no active verified user who has been assigned a role that includes the rights to create requisitions for that program. The role must be assigned to a user for whom the facility is their home facility, or to a user has been assigned the role at a supervisory node over the facility. If no user holds this role, it will not be possible for the facility to create and submit requisitions for the program.
2. Facilities Missing an Authorize Requisition Role: This report will identify any facilities where a program is operating but there is no active verified user who has been assigned a role that includes the rights to authorize requisitions for that program. The role must be assigned to a user for whom the facility is their home facility, or to a user has been assigned the role at a supervisory node over the facility. If no user holds this role, it will not be possible for the facility's requisitions for the given program to be authorized, and then advance for review and approval.
3. Facilities Missing an Approve Requisition Role: This report will identify any facilities where a program is operating but there is no active verified user who has been assigned a role that includes the rights to approve requisitions for that program. The role must be assigned to a user for whom the facility is their home facility, or to a user has been assigned the role at a supervisory node over the facility. If no user holds this role, it will not be possible for the facility's requisitions for the given program to be approved, and eventually get released as an order.
Messages are translateable pieces of content that are a part of the OpenLMIS-UI. The best way to update a message is by configuring the OpenLMIS-UI to use your implementation's Transifex settings and editing the message directly in Transifex. What Transifex does is replace a message key, which is defined in the UI, with a human readable message. This is how the OpenLMIS-UI supports multiple languages.
See the example below:
<!-- HTML similar to this, will be updated by Transifex once the OpenLMIS-UI is built and run in a browser --> <p>{{ 'example.instructions' | message }}</p> <!-- The above message will be displayed to a person using the OpenLMIS-UI as: --> <p>These are some instructions</p>
The strategy in the OpenLMIS-UI is to not reuse specific message keys, and let the tools in Transifex group messages that are the same together into a single spot for translation. This allows an implementer to further customize small messages such as 'Search' to 'Search Facilities' if the needs of their implementation require more specificity.
If there are large message string changes, it is possible for an implementer to replace the messages_en.json file, and make the changes that are needed. This is possible as a last resort but not recommended.
Configuring Time Zones
A timezone may optionally be associated with the TIME_ZONE_ID property in a distribution's .env configuration file.
The default implementation generates 8 digit, base36 numbers. It can be customized using an extension point:
Create an extension. See an example here. Include fulfillment service with version >6.0.1 as a dependency in build.gradle:
dependencies {
	compile "org.springframework.boot:spring-boot-starter-web"
	compile "org.openlmis:openlmis-fulfillment:6.0.1"
}
|
Within the extension module, create a bean that implements OrderCodeGenerator interface. Annotate it with some id, e.g. YourCustomizedCodeGenerator
Create a docker image that holds your implementation's extensions. See this example.
Add your extension as a dependency in build.gradle and configure it in extensions.properties like so:
OrderCodeGenerator=YourCustomizedCodeGenerator |
Note: The value has to match bean id.
OpenLMIS provide a means for a customer to use their own template for the Proof of Delivery Report. The template customization includes use of all data elements that are available while preparing the template with Jaspersoft Studio. For detailed instruction about how to create/modify Reports, see the Jaspersoft Studio user guide. To add fields you need to register them from sql query. You can use tables from schemas fulfillment and referencedata. There is an assumption that both schemas are in the same database. Changing the template also requires using software development tools like Curl and/or Postman. If you are not familiar with these tools, you may need to request support from a developer to upload the new report template into OpenLMIS.
Available Parameters to use in your .jrxml template that are defined by OpenLMIS fulfillment service are: format (e.g. "pdf"), REPORT_LOCALE (current locale), REPORT_RESOURCE_BUNDLE (resource bundle for locale with messages), subreport_dir (points to reports folder in fulfillment service resources), image_dir (points to folder with images in fulfillment service resources), pod_id.
Available Resources can be found in OpenLMIS Github repository.
The default Proof of Delivery Report built into OpenLMIS uses podPrint.jrxml that can be found in Github repository. To change it to a custom template, call "multipart/form-data" POST request for endpoint /api/reports/templates/fulfillment with the following in the body:
The access token will be necessary for user with right REPORT_TEMPLATES_EDIT.
Example request using curl: curl -i -X POST -F "file=@/some/path/podPrint.jrxml" -F "name=Print POD" https://test.openlmis.org/api/reports/templates/fulfillment?access_token=64d046f-c4b5-49fe-842e-5a5b049699f5
Example request using Postman:
Some reports contain static images, such as a logo to appear at the top. In order to add or customize an image in a report, a user has to upload it by making a POST request to the /api/reports/images endpoint with the following in the body:
Example request using Postman:

After the image has been uploaded, you can reference it in report's template by adding a parameter with its name. The type has to be java.awt.Image and isForPrompting set to false.
<parameter name="example-image" class="java.awt.Image" isForPrompting="false"/> |
The image element (generated by JasperReports Designer) looks like this:
<image>
  <reportElement x="20" y="10" width="130" height="60" uuid="50f2c4e9-d19d-4264-887d-0645674af6d1"/>
  <imageExpression>
    <![CDATA[ $P{example-image} ]]>
  </imageExpression>
</image> |
For instructions on how to customize report's template, see previous section.
Note: When uploading the template, use the endpoint from the openlmis-report service: /api/reports/templates/common
It is possible to define custom Jasper reports and get them to show up on the UI by uploading Jasper source files (.jrxml) to the API. In order to do so:
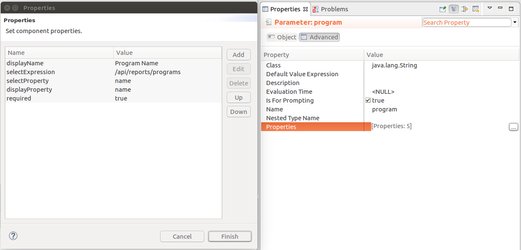
Required properties:
Optional properties:

An access token with REPORT_TEMPLATES_EDIT right is required to make that request.
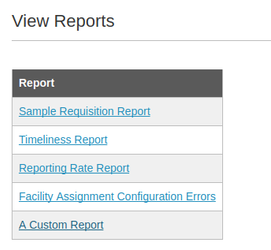
OpenLMIS allows for integration with external partners by using service accounts that are managed by the administrator. The administrator must generate a new API Key by clicking Add, and the system will automatically generate a key to provide to the external partner manually. API Keys do not expire, and require the administrator to remove them by clicking Delete. The Service Accounts table will display all API Keys, with the most recent at the top of the table.
