Testing the OpenLMIS Reporting Stack
High Level Test Plan
This section provides an overview of the end state of the testing solutions for the reporting stack.
| The functionality we would like to test is | We will automate tests by |
|---|---|
|
|
Current Manual Test Plan
Test 1: Validate that services stand up correctly and web interfaces are available
- Clone the Github repository for the target branch or tag and run the following commands
# Clone the repository
git clone https://github.com/openlmis/openlmis-ref-distro
# Enter the directory
cd openlmis-ref-distro
# Copy the settings.env
cp settings-sample.env settings.env
# Enter the reporting directory
cd reporting
# Stand up the docker reporting service
docker-compose up
When running it locally, add the following to the host's etc/host file before running docker-compose up
127.0.0.1 nifi.local superset.local
- You should see all containers running and the logging should start. Wait approximately 3 minutes
- In the computer's browser, enter http://nifi.local/nifi and you should see Nifi up and running
- In the computer's browser, enter http://superset.local/login and you should see the Superset login the Admin and password are available in environment file
Test 2: Validate that Nifi is connected to the Nifi Registry
- In the computer's browser, enter http://nifi.local/nifi
- Drag a processor group onto the screen
- Click the "Import" button
- If the Import button does not appear, the Nifi Registry connection is not configured
- Click on the far right menu icon and under controller settings registry client, confirm that the nifi registry is well configured
- The next menu should populate with a Registry Name and list of available Buckets
- If this does not populate, the connection to the Nifi Registry is not functioning
Test 3: Validate the Nifi "Kick Off" Flows Function as intended
The Nifi "Kick Off" flow focuses on standing up the integration with OpenLMIS v3, NiFi, Postgres and Superset. The end state is a fully functioning integration between these systems with data flowing between them. The minimal use case for this test focuses on facility information.
- Load NiFi and login with the credentials defined in
.envfor NiFi's NGINX - Confirm that the following six process groups have been loaded
- Generate MeasureReports
- Generate Measures
- Materialized Views
- Reference Data Connector
- Requisitions connector
- Superset Permissions
- Check that all passwords are loaded for controller services, InvokeHTTP processors and the global variables per process group are configured
- If processor groups are not already loaded and in a running state, the test has failed.
- Superset
- Load superset and login with OpenLMIS v3 admin credentials
- Under the dashboard list, load Administrative dashboard displaying geographic zone information
- If you don't see this, the test has failed
- You should see a table showing all facilities from OpenLMIS
- Compare this table against the OpenLMIS v3 Admin screen for facilities list
- There should be a 1-to-1 match.
- If there isn't a match, the test has failed.
Test 4: Validate All Reports embedded within OpenLMIS
- This should validate that all of the fields are displaying correctly and filters are functioning based on the demo data that's currently available in the system
- Login into superset with your OpenLMIS credentials to generate a token that will authorize access
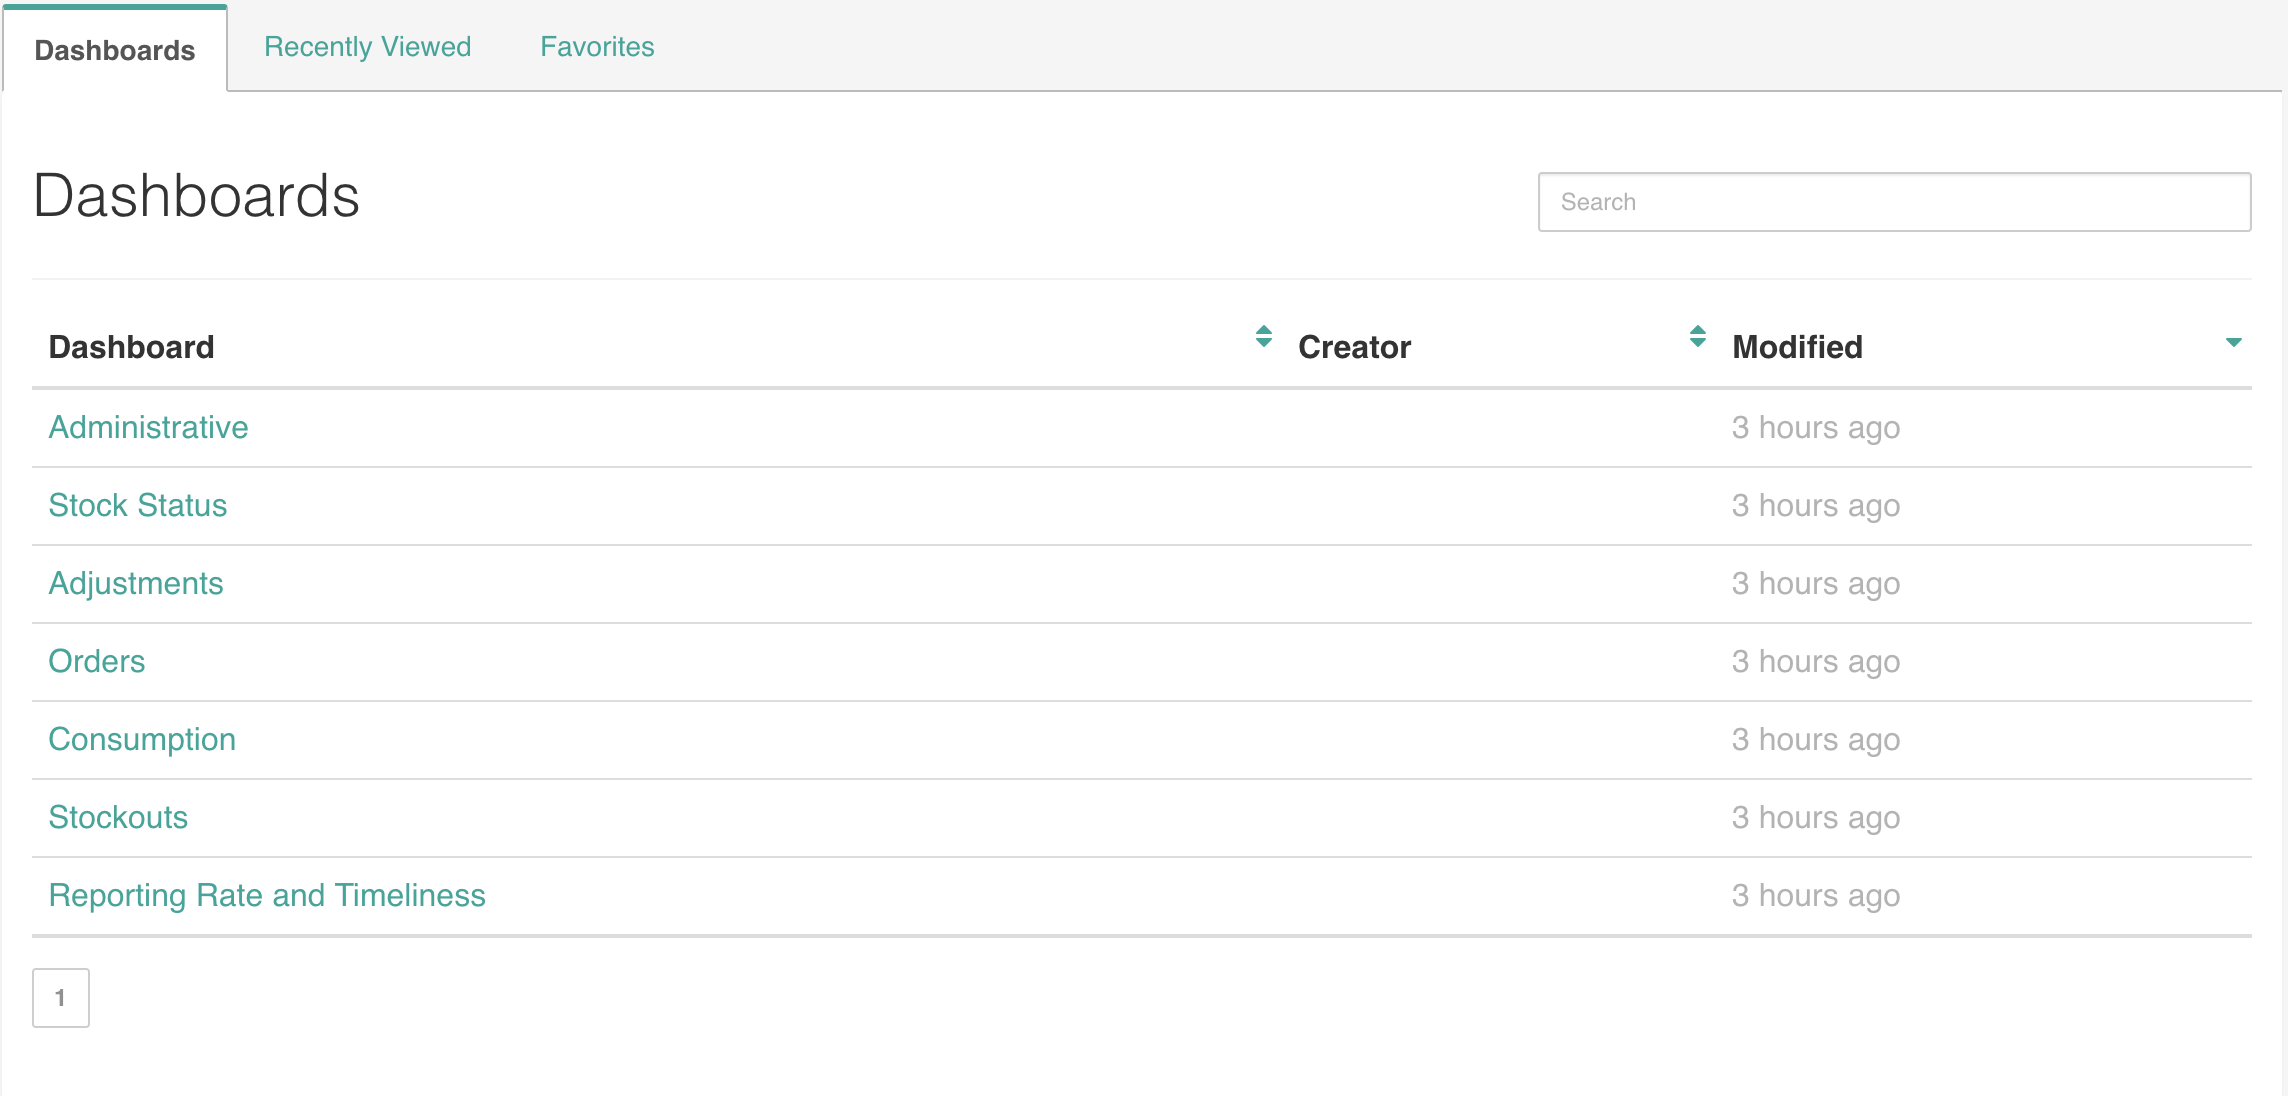
- The landing page should be http://superset.local/superset/welcome with the following dashboards list displayed
If any of the dashboards is missing from the list, the test has failed
- Preview all dashboards to ensure
- All charts have no errors
- Data has been loaded
- Dashboard filters work as expected
- Preview all dashboards to ensure
- For each of the dashboards, they should be displayed as in the images below
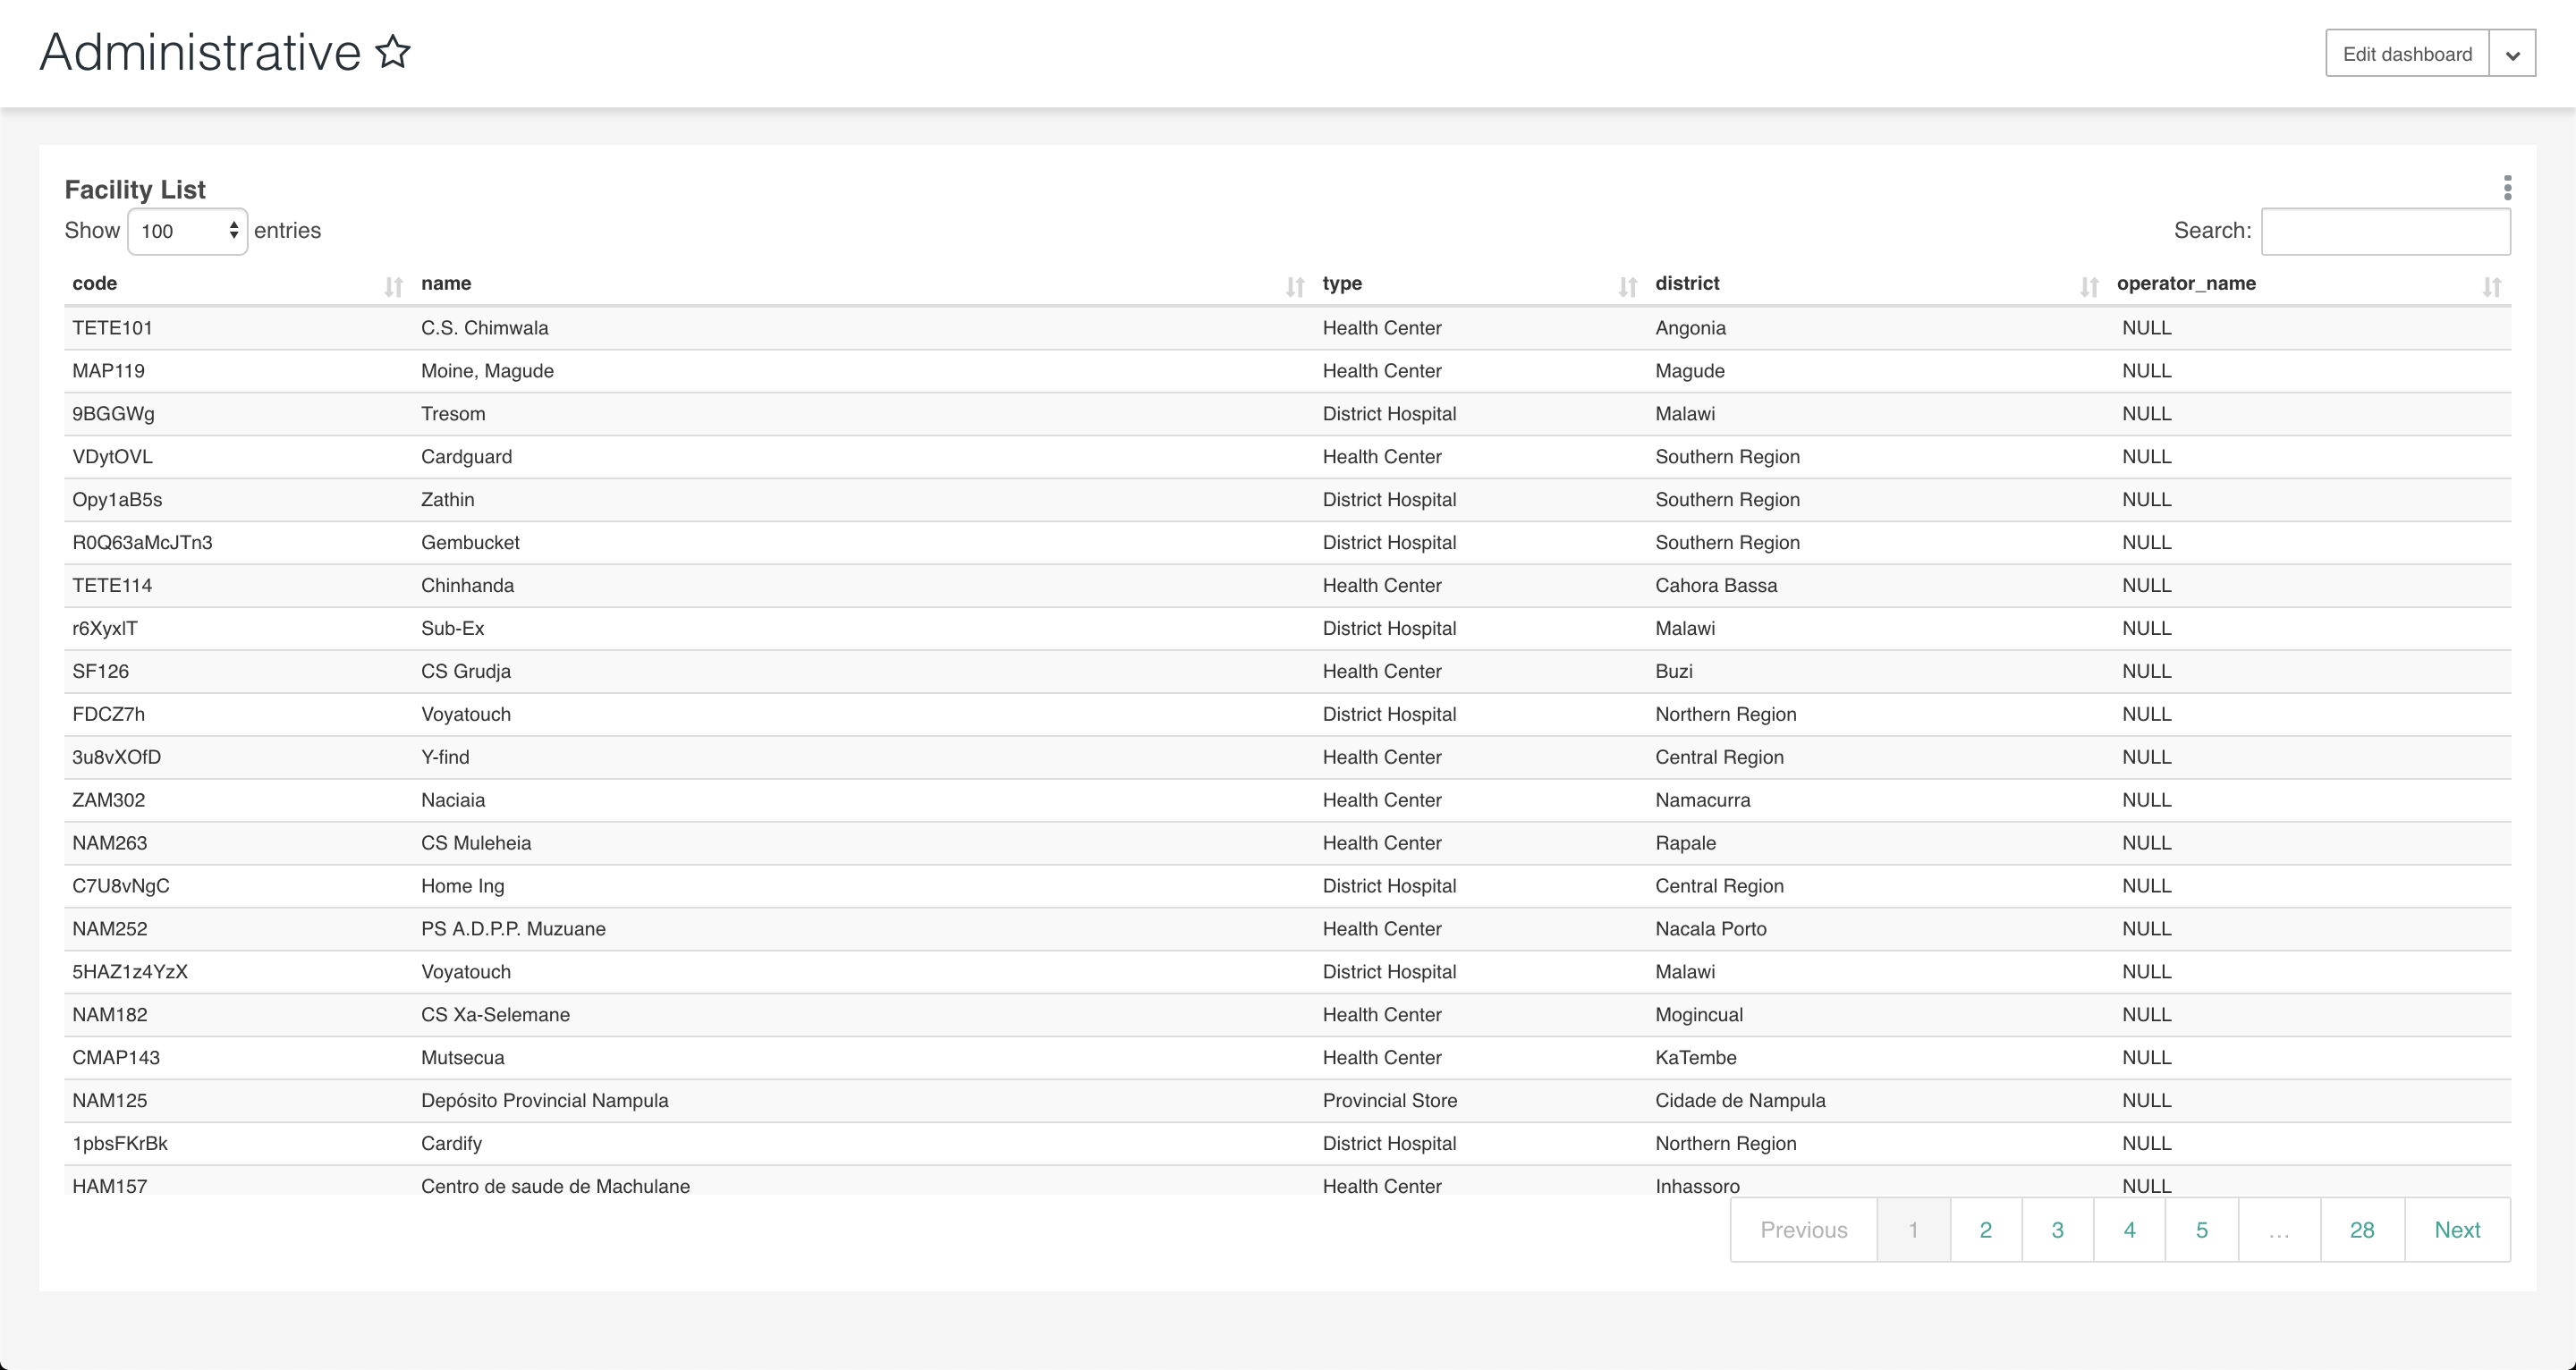
Administrative
The administrative displays the Facility List which should be an exact 1-to-1 match to the facility list in Admin's OpenLMIS.
The test fails if the chart is blank or there isn't a 1-to-1 match on the facilities.
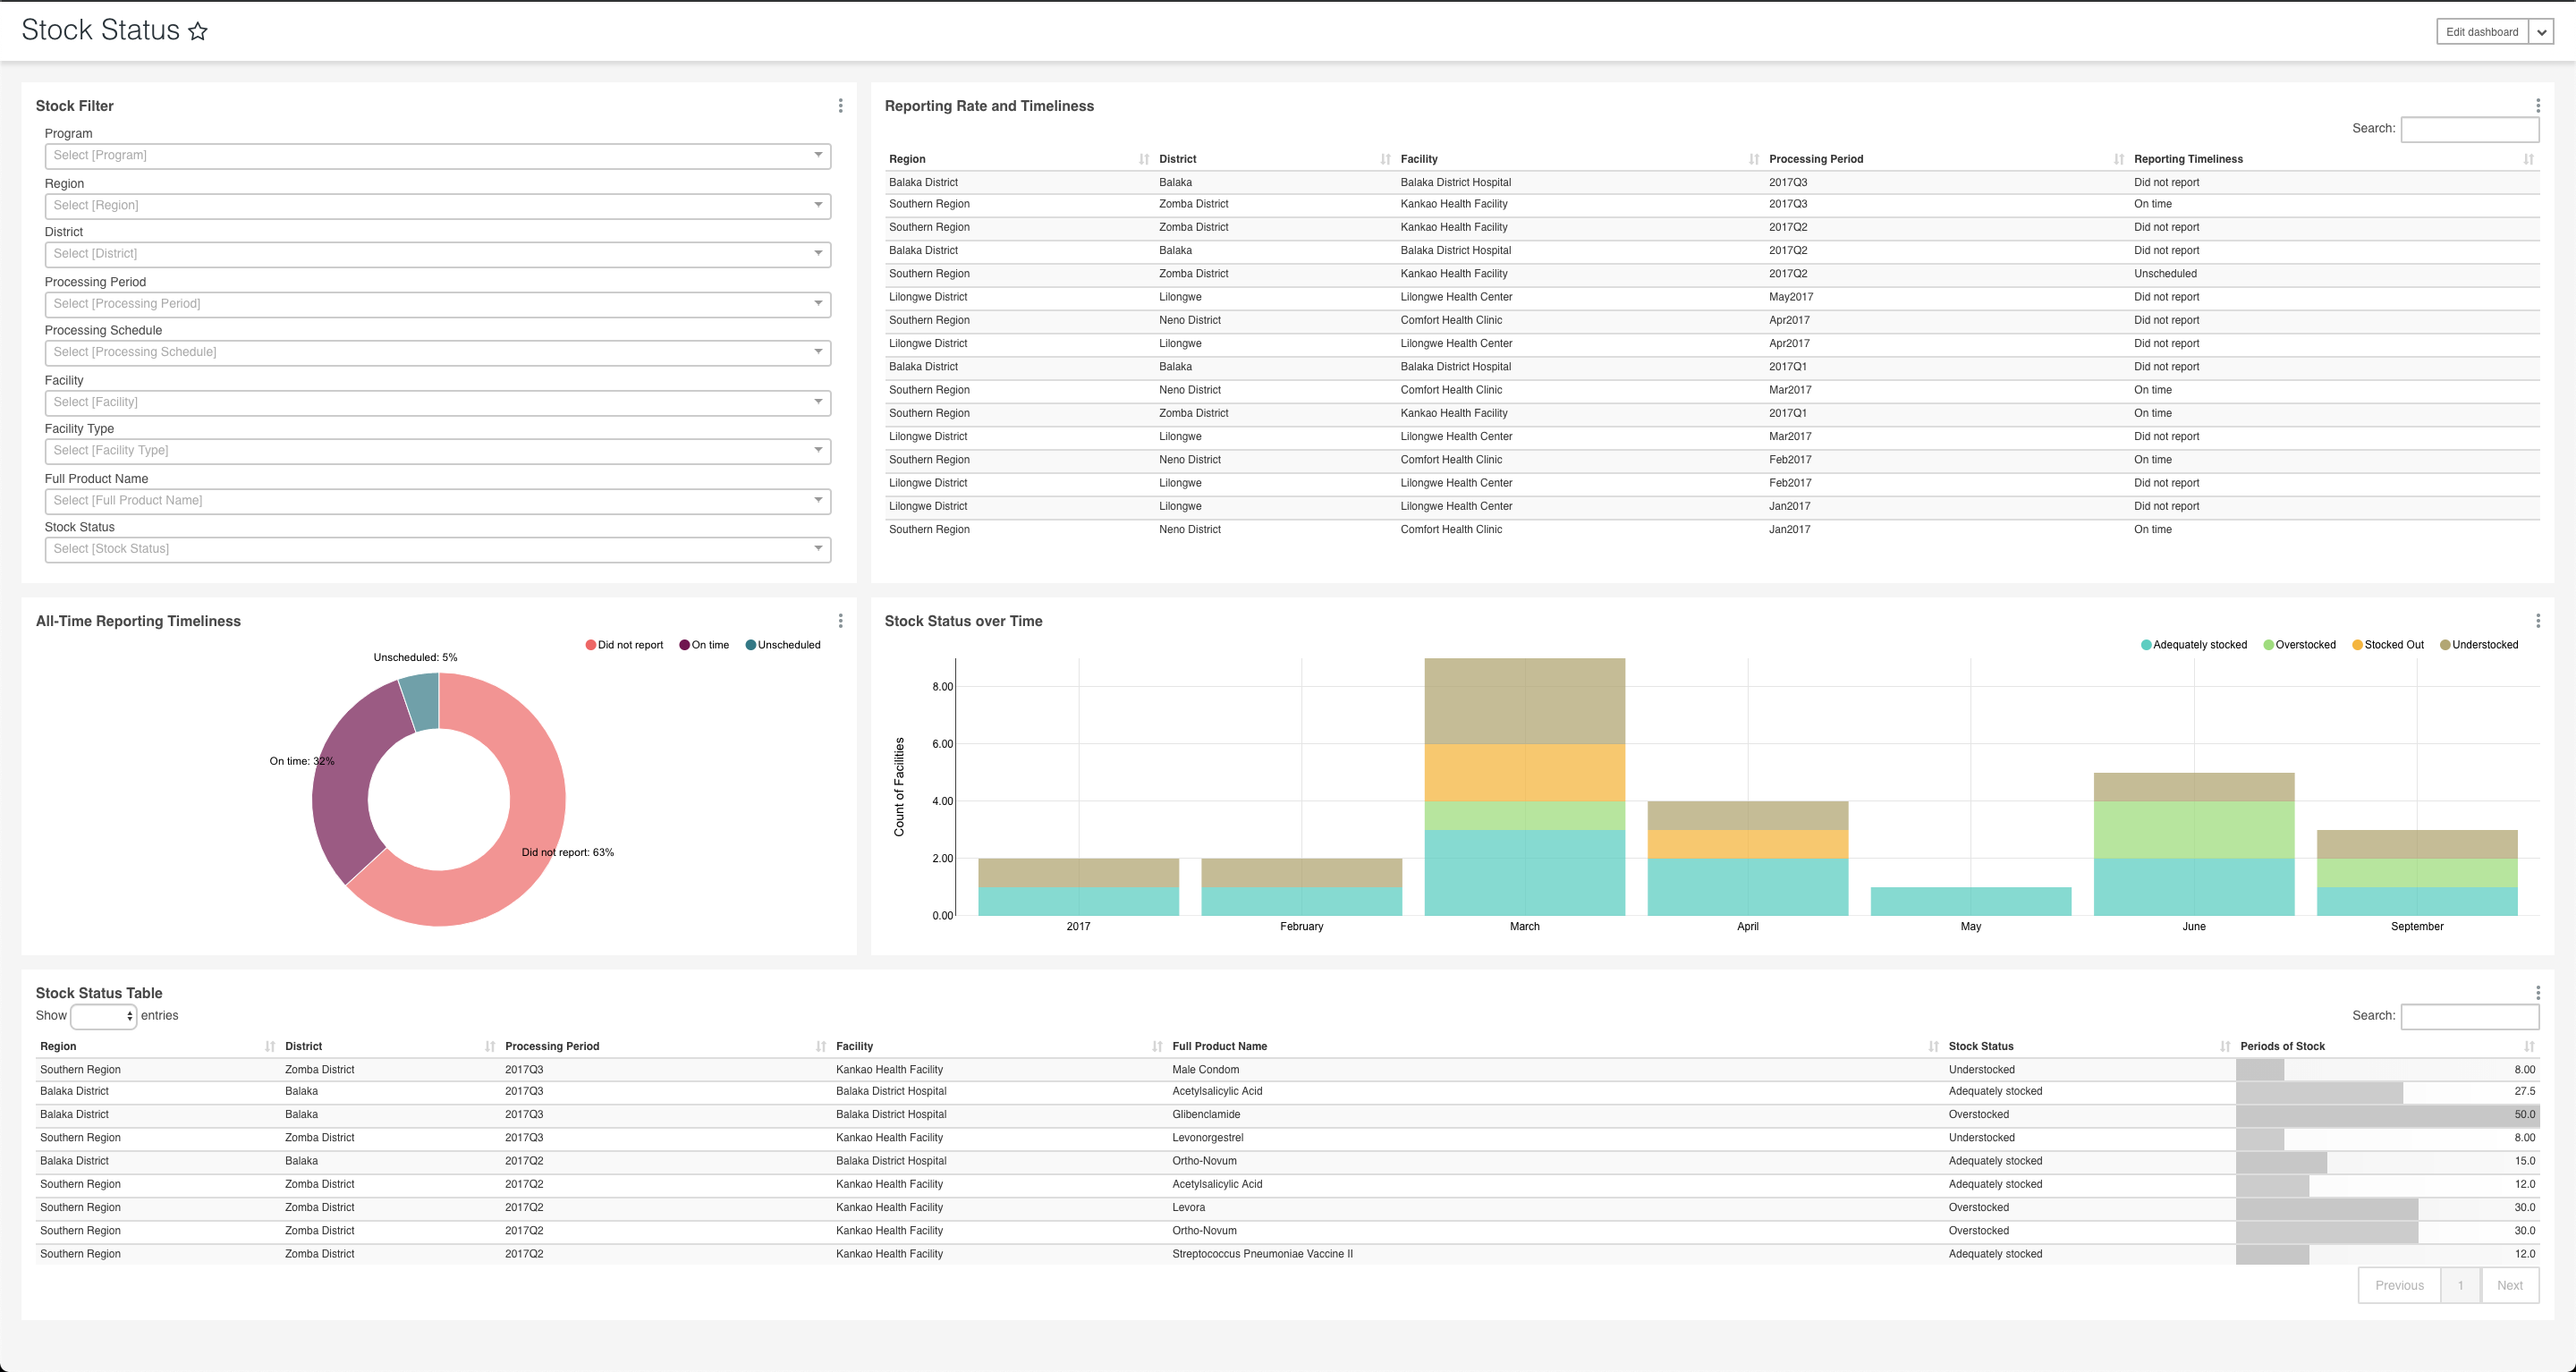
Stock Status
The stock status dashboard should display 5 charts: Stock filter, Reporting rate and Timeliness, All-time reporting timeliness, Stock status over time and stock status table.
All charts should display correctly as below otherwise the test fails.
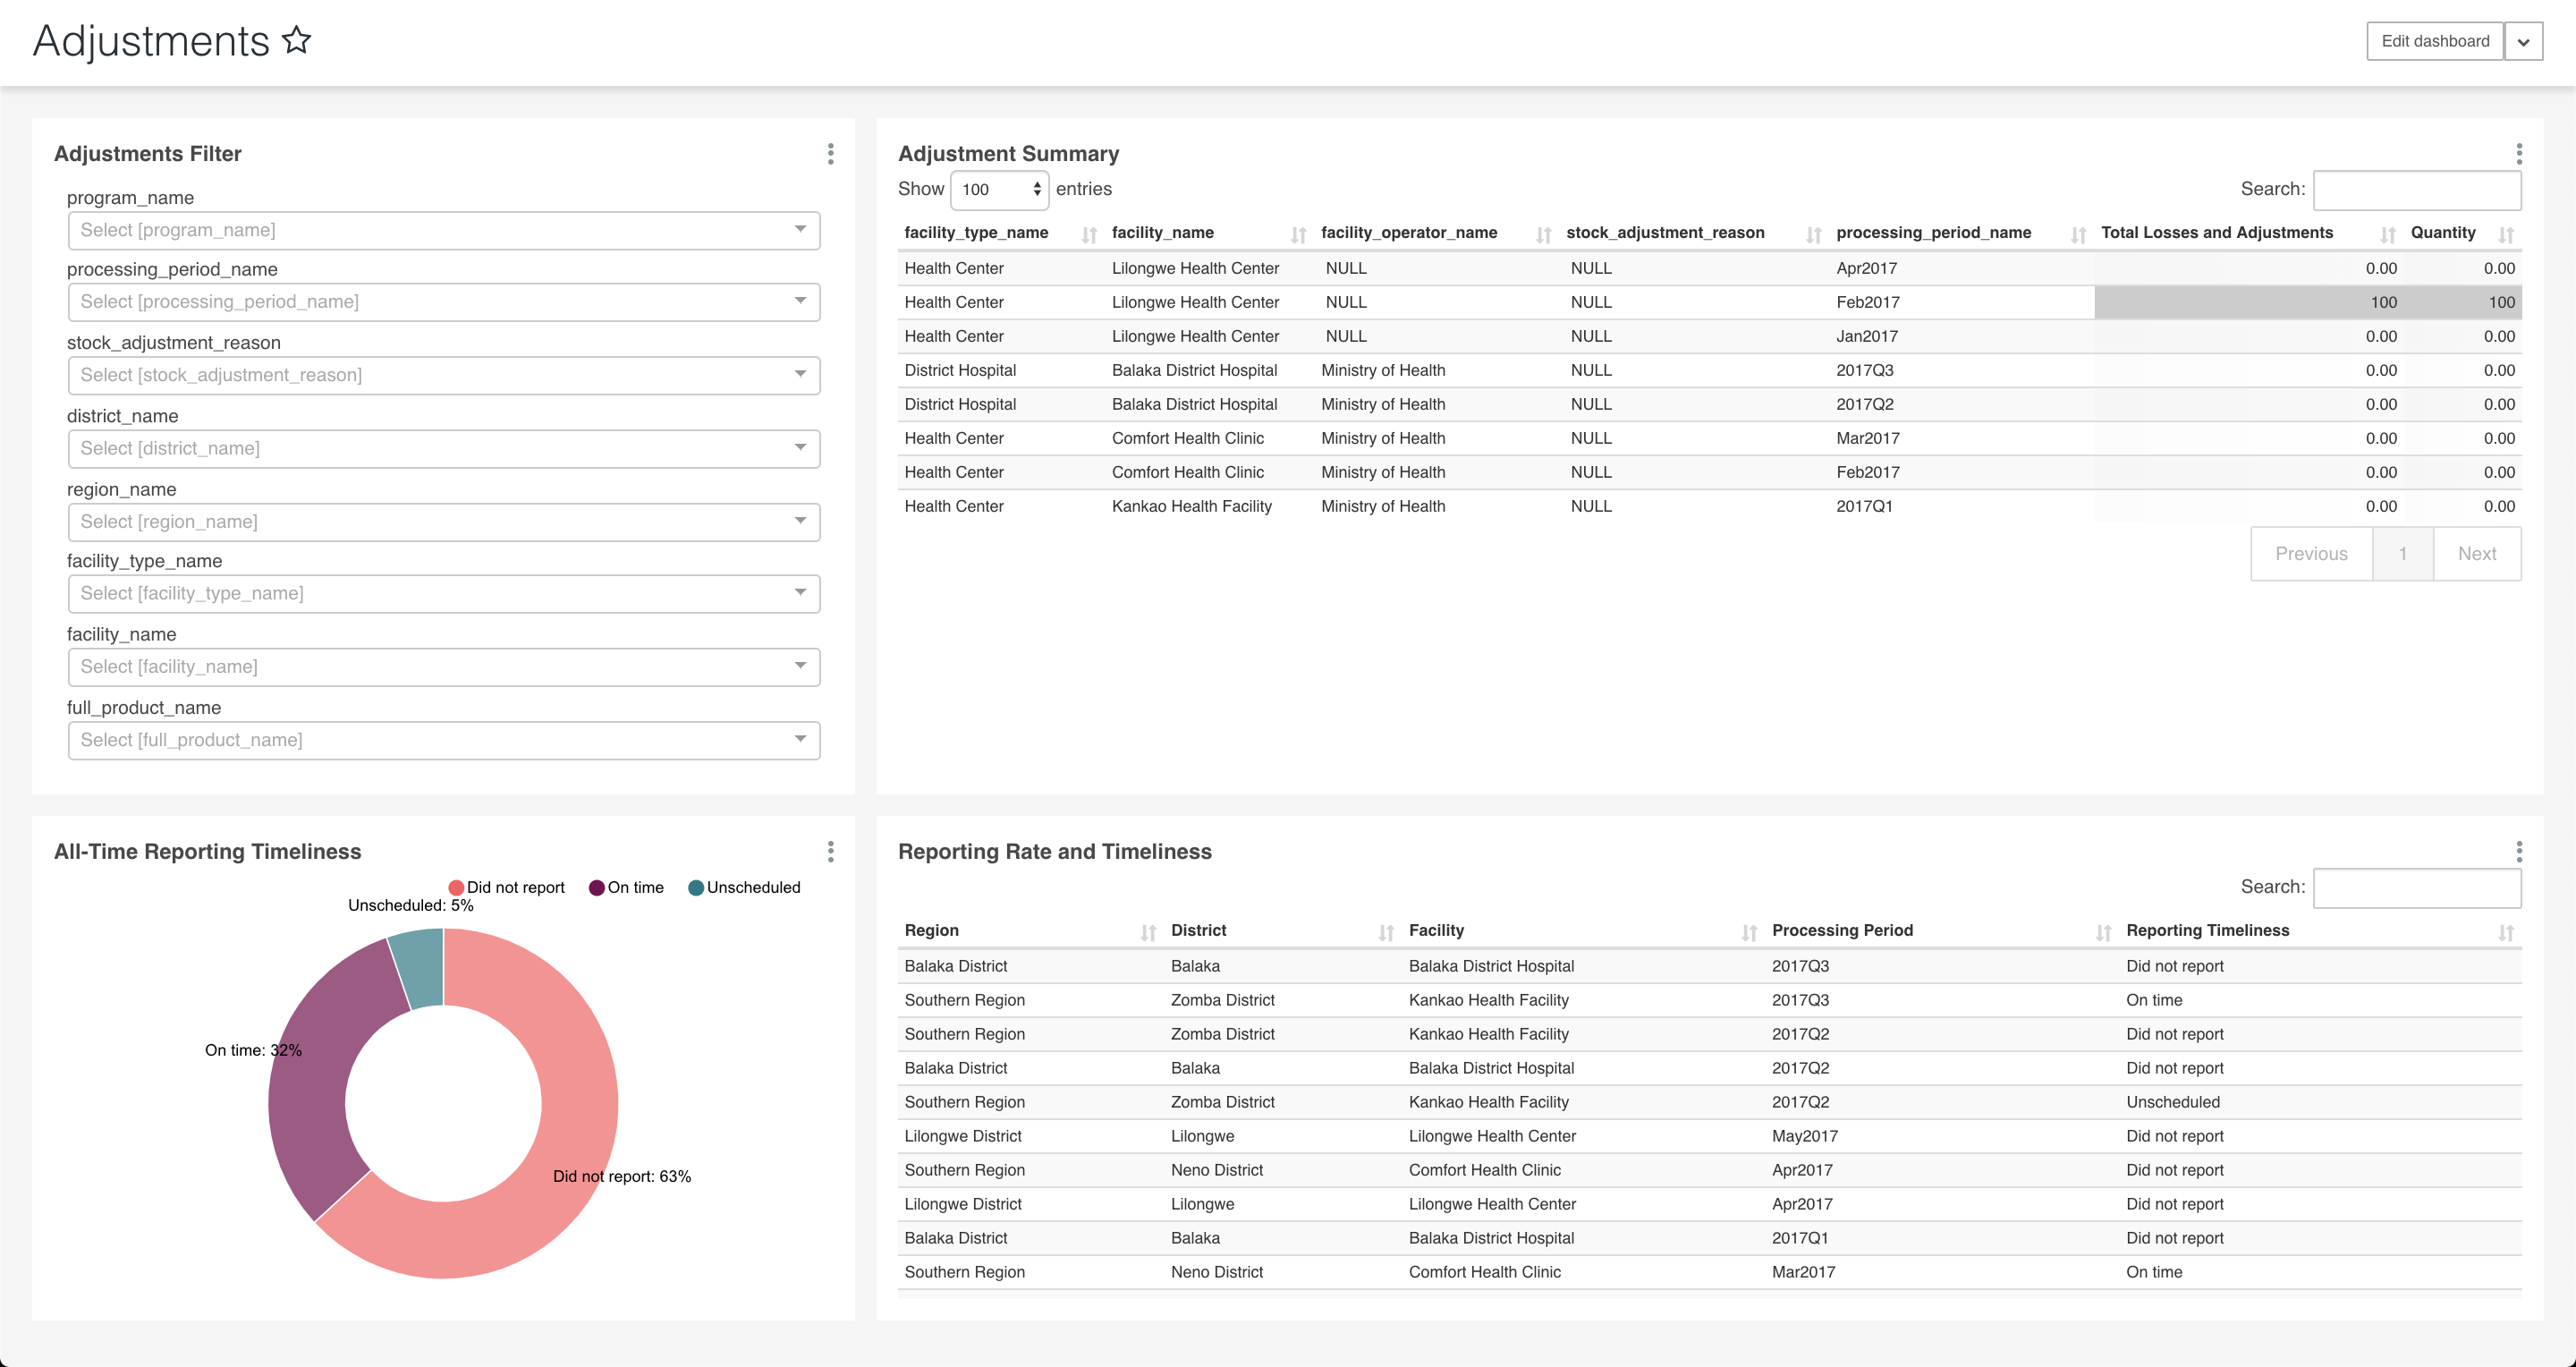
Adjustments
The adjustment dashboard should display 4 charts: Adjustments filter, Adjustments Summary, All-Time Reporting Timeliness and Reporting Rate and Timeliness.
The test fails if the dashboard doesn't look as below.
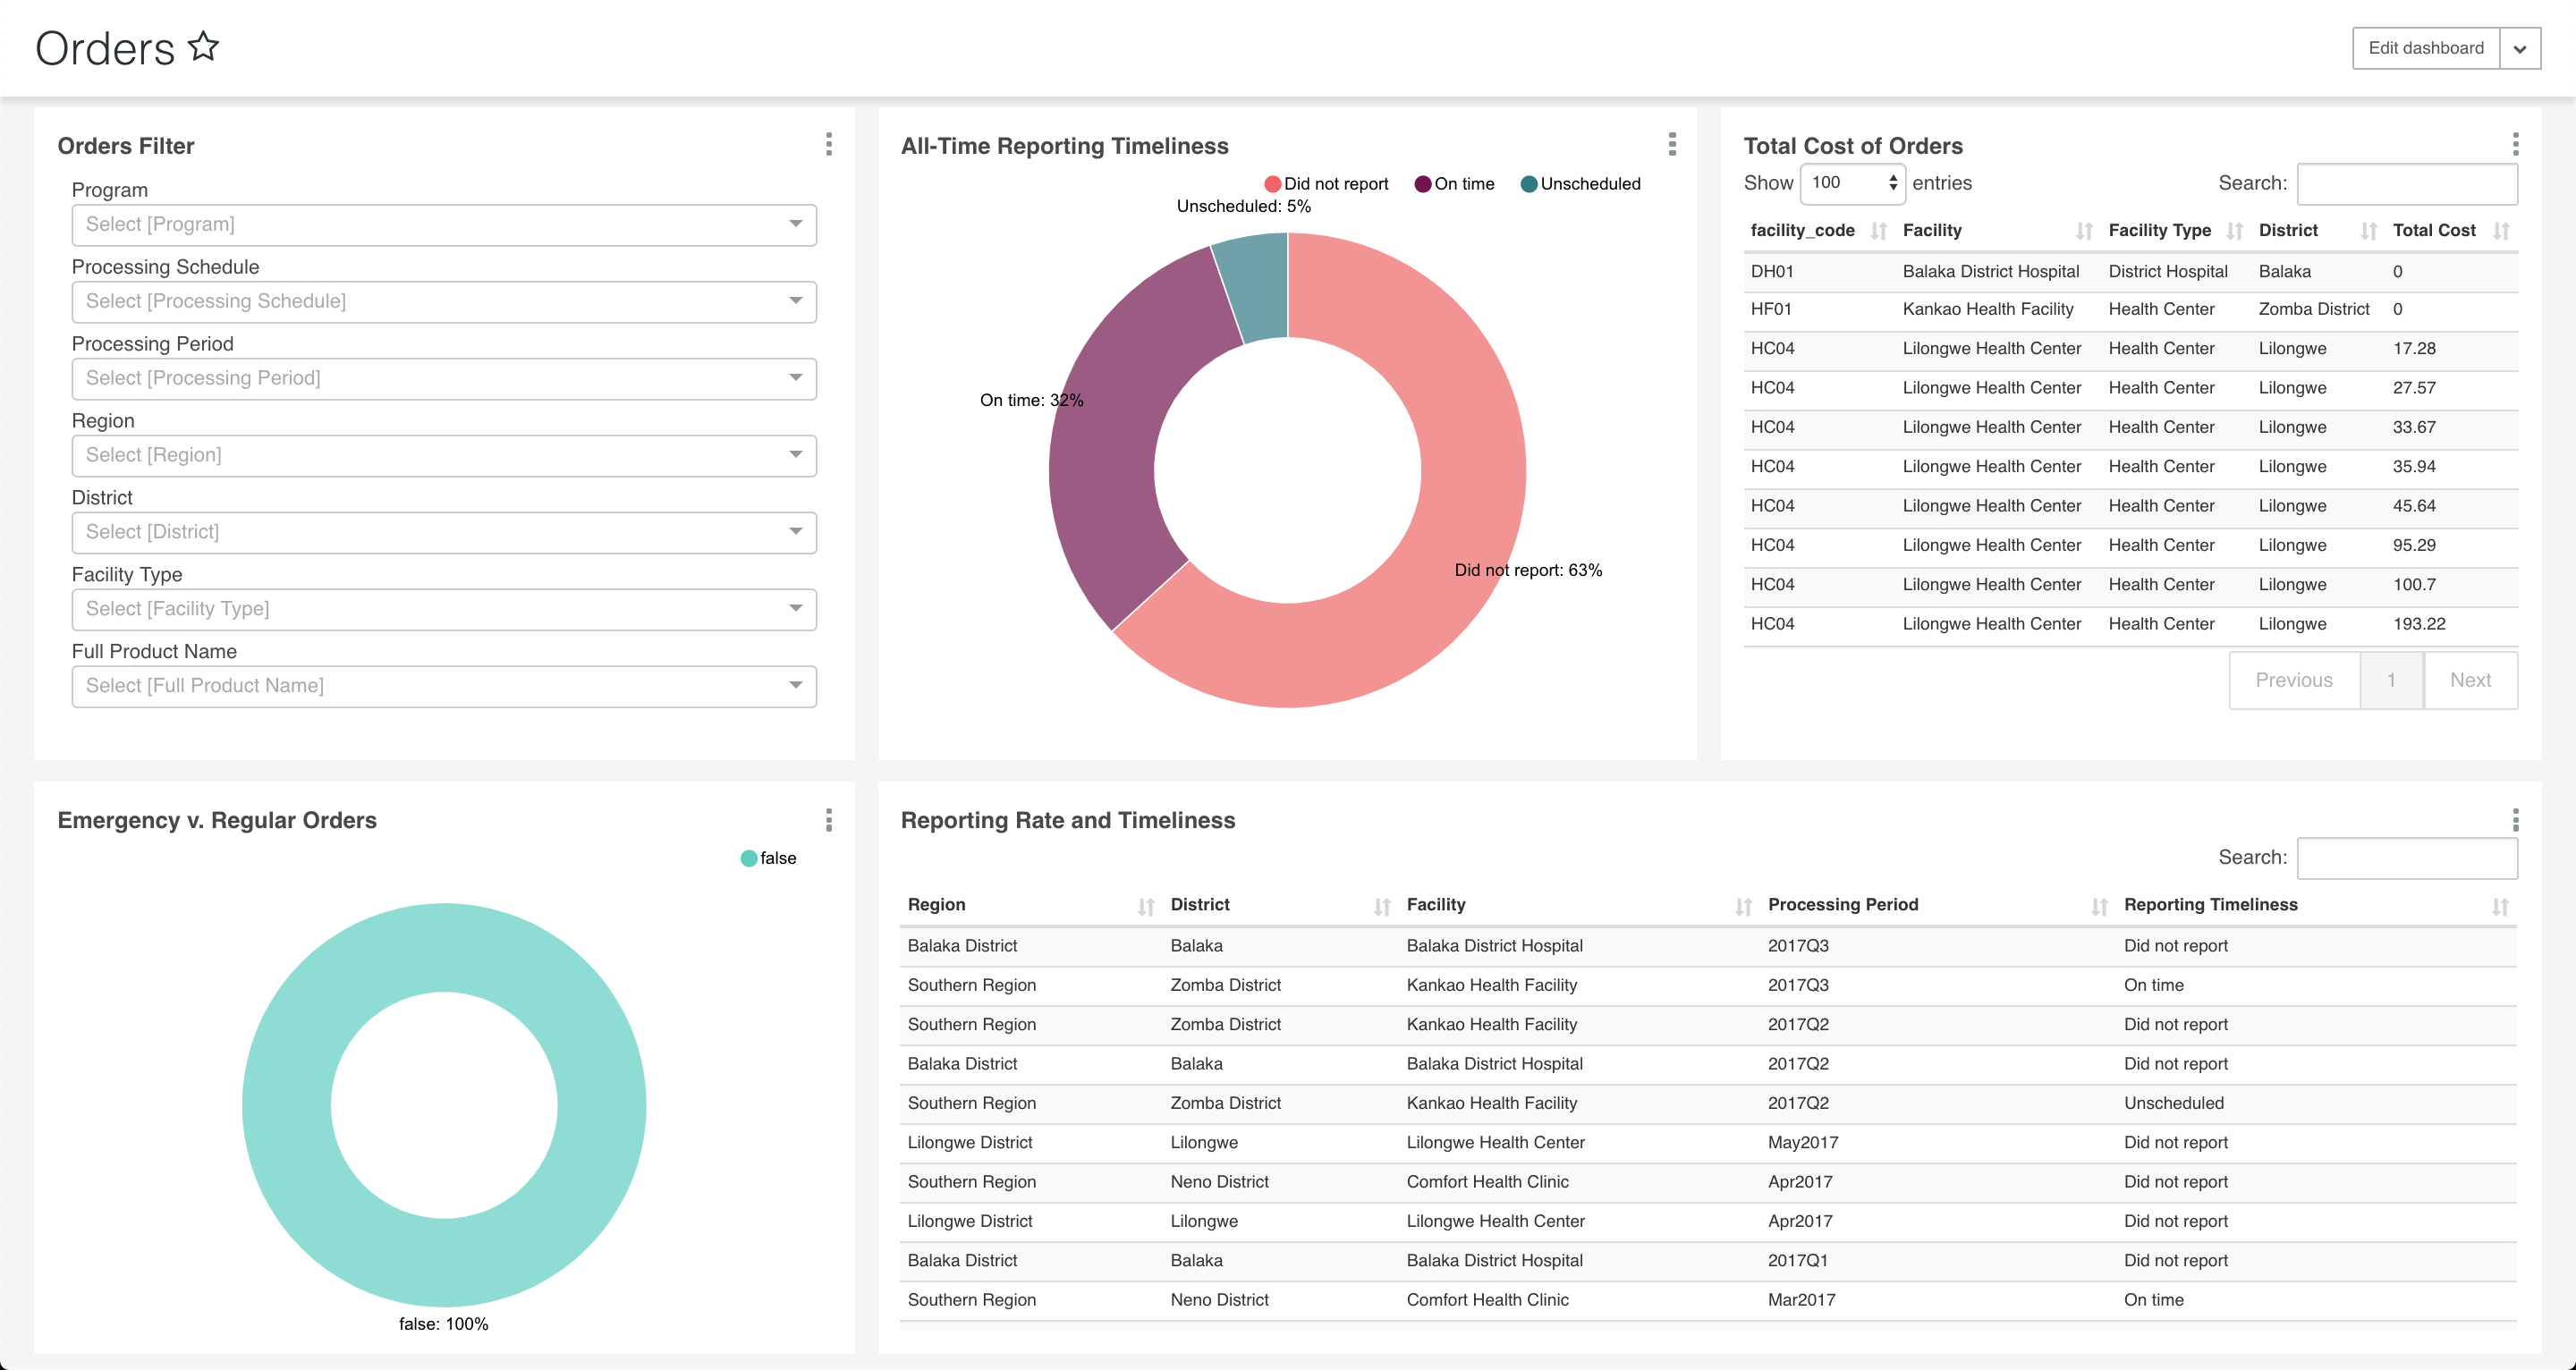
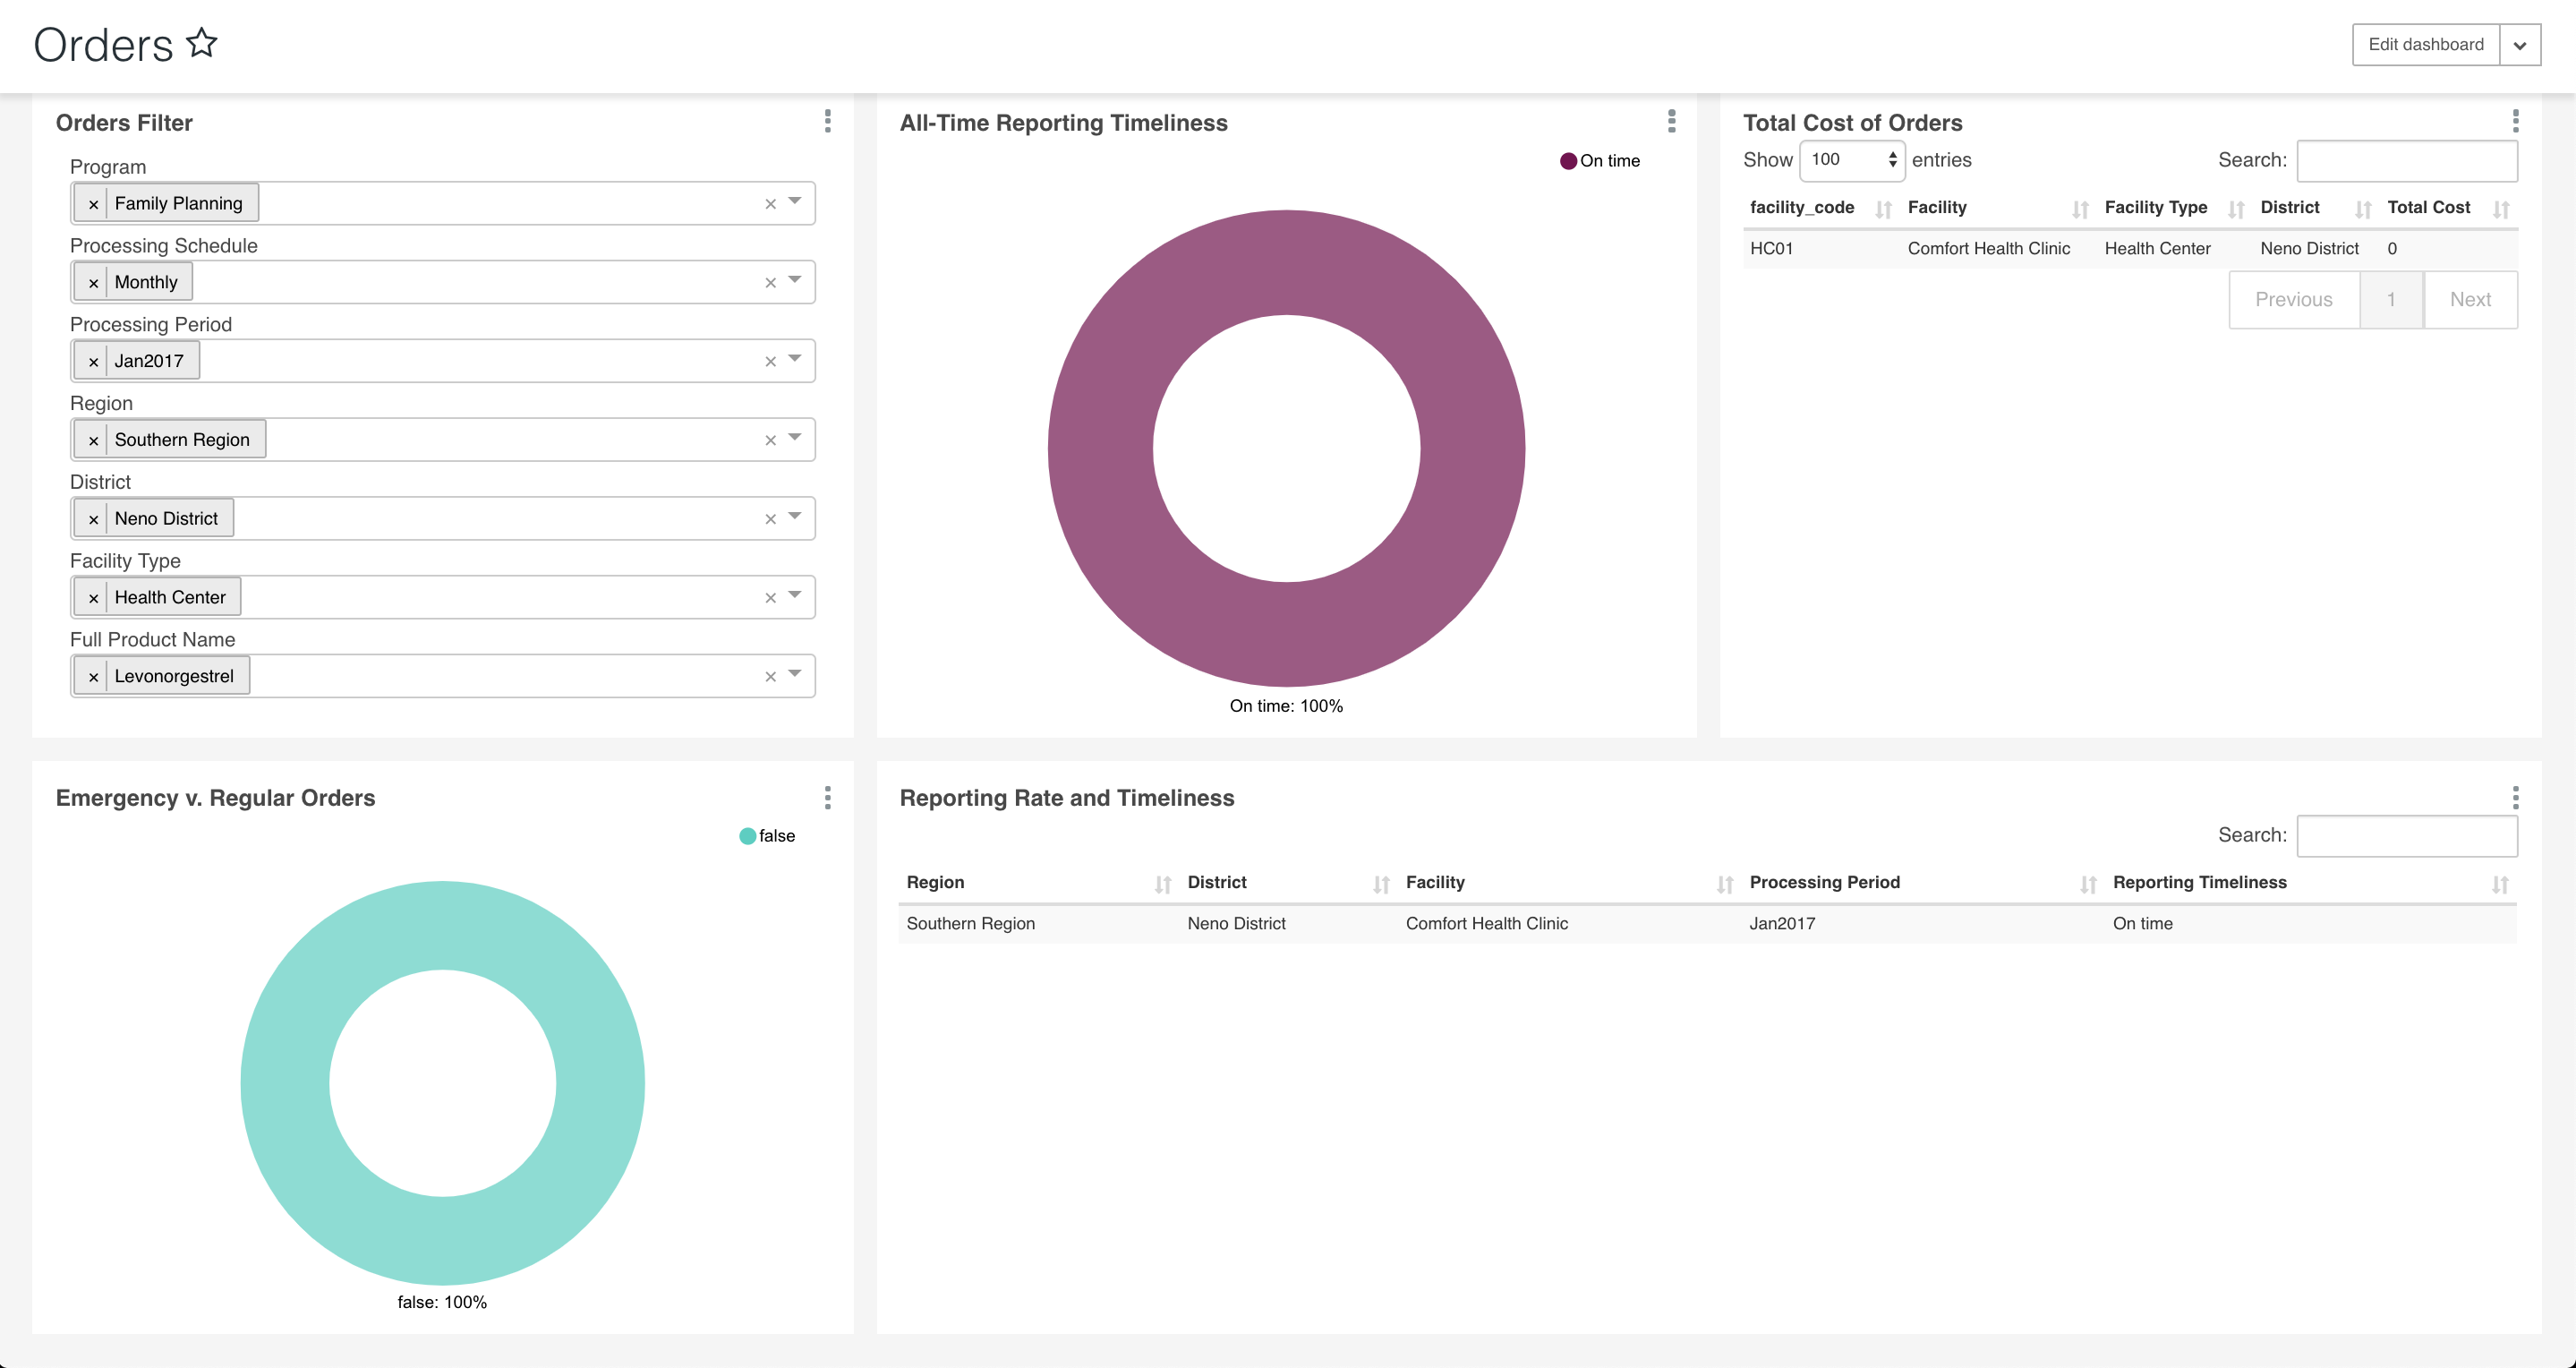
Orders
Orders dashboard should contain 5 charts: Orders filter, All-Time Reporting Timeliness, Total Cost of Orders, Emergency v. Regular Orders and Reporting Rate and Timeliness.
After the loading the dashboard, the charts displayed should be as below varying from user to user.
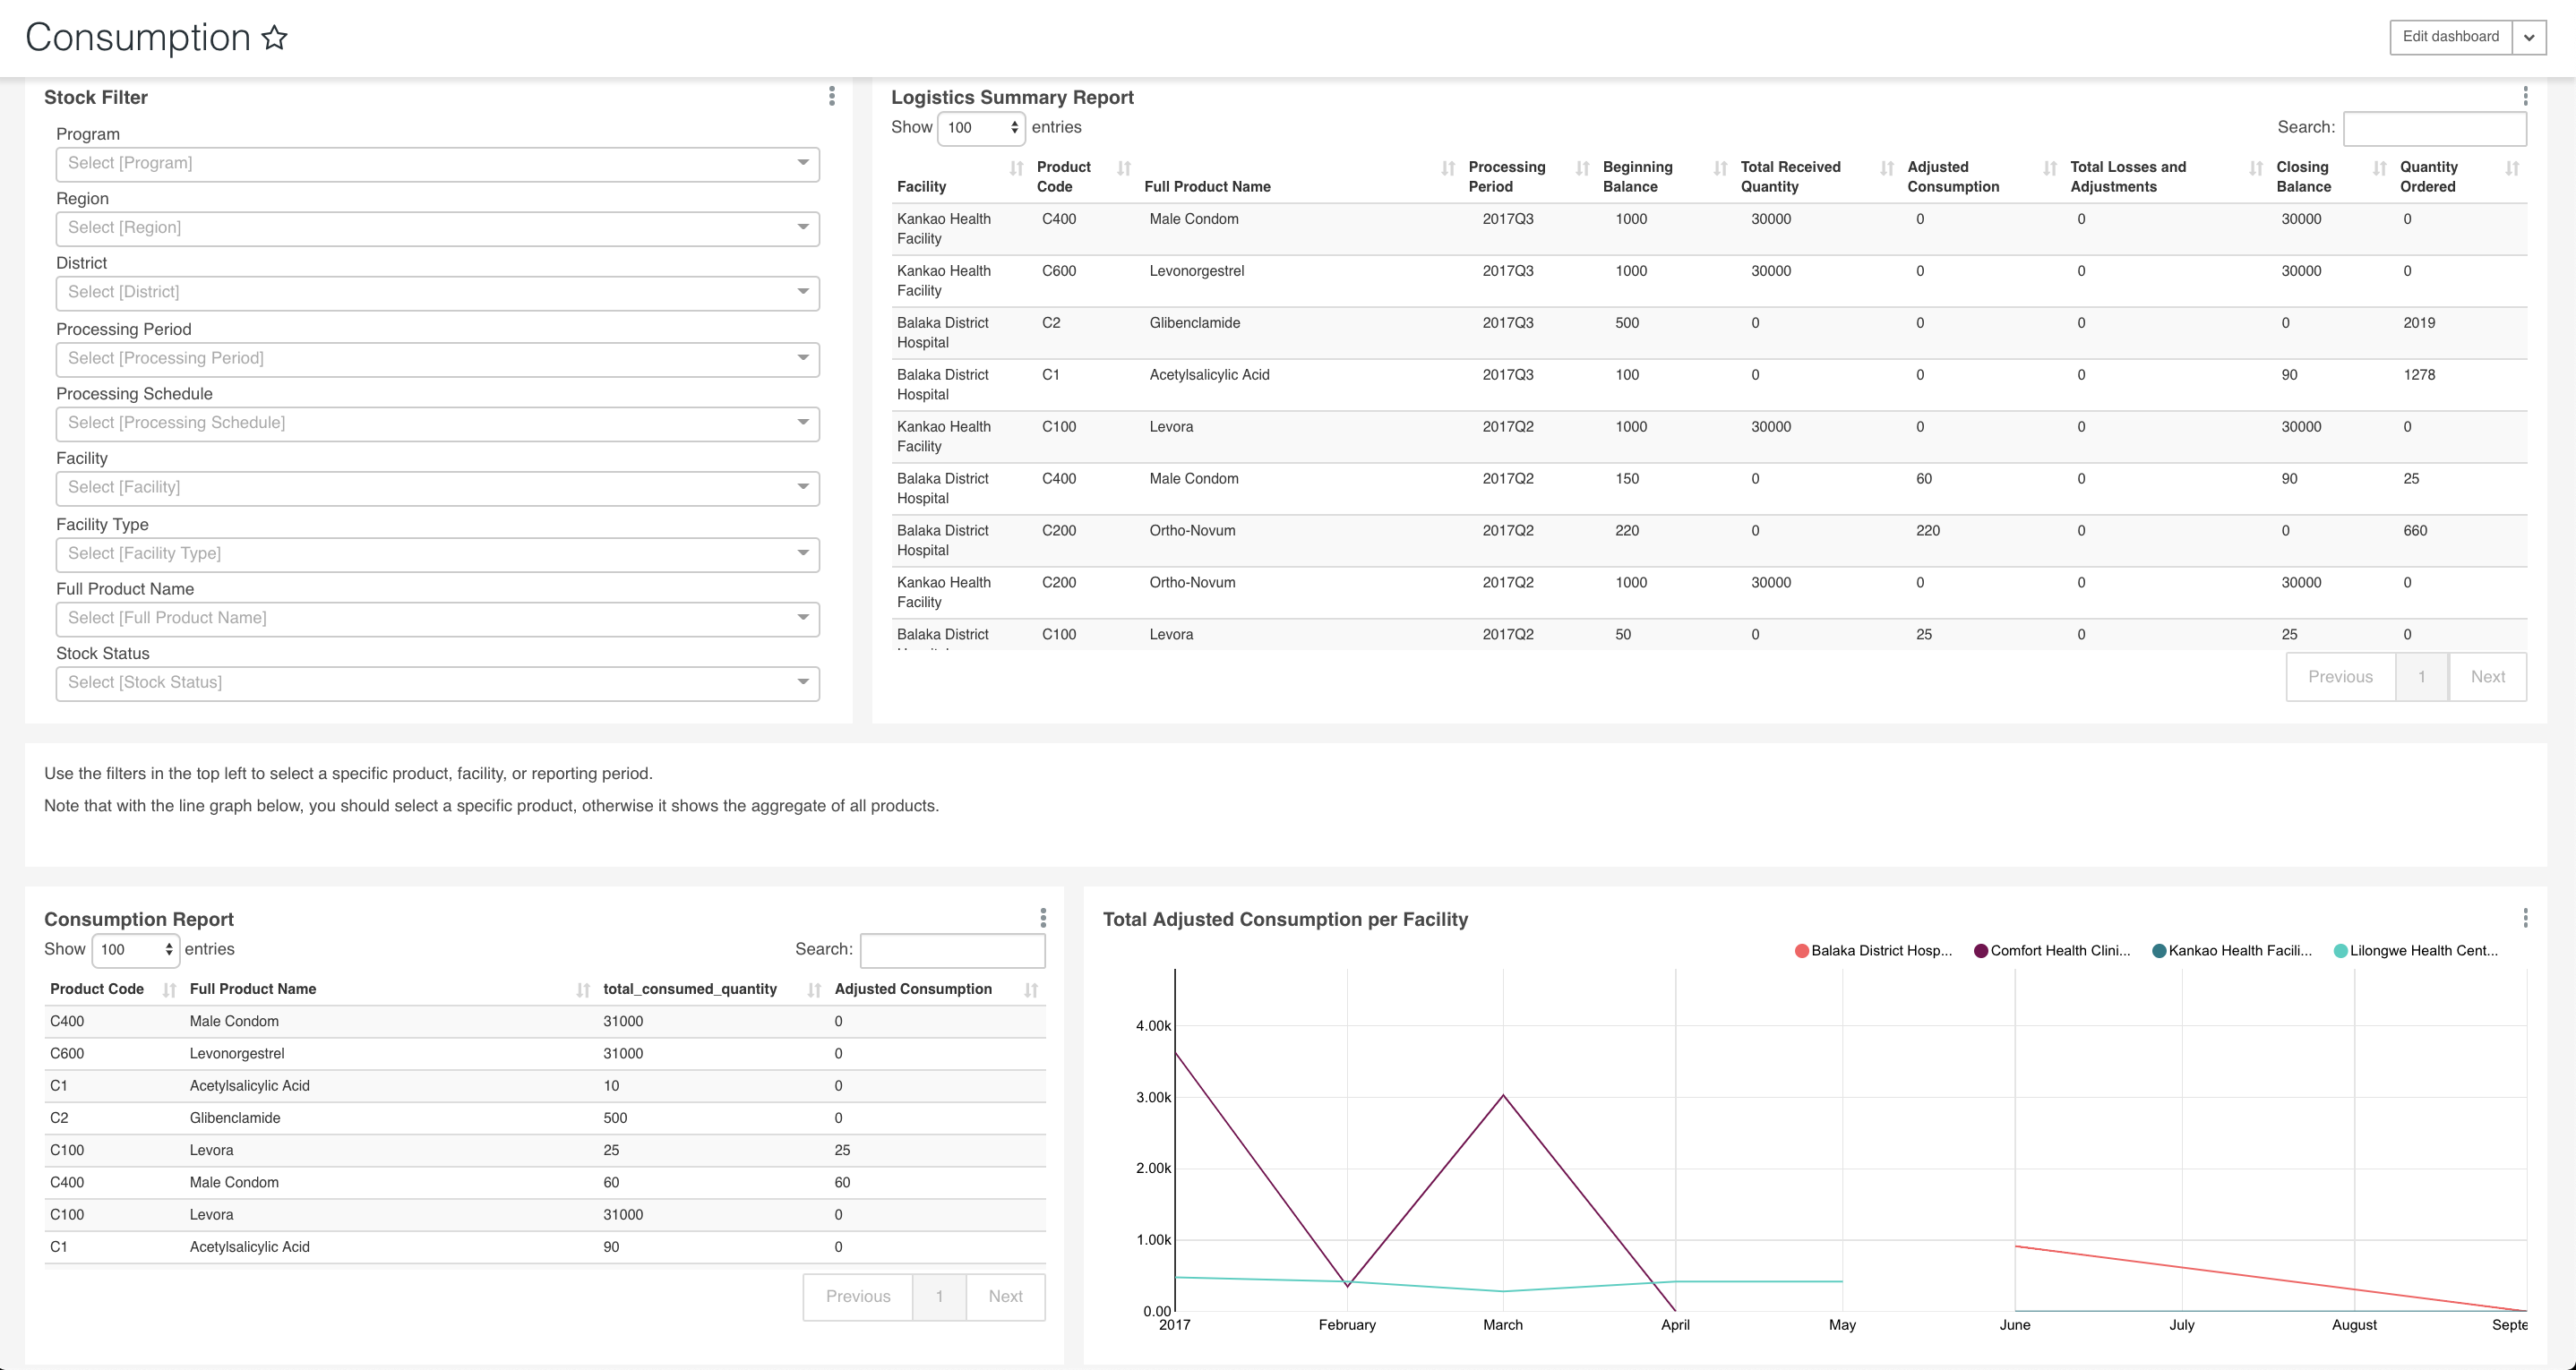
Consumption
The consumption dashboard should display 4 charts and 1 markdown row as below. The charts expected are: Stock filter, Logistics Summary Report, Consumption Report and
Total Adjustment Consumption per facility. The test fails if data is missing or any of the charts has an error.
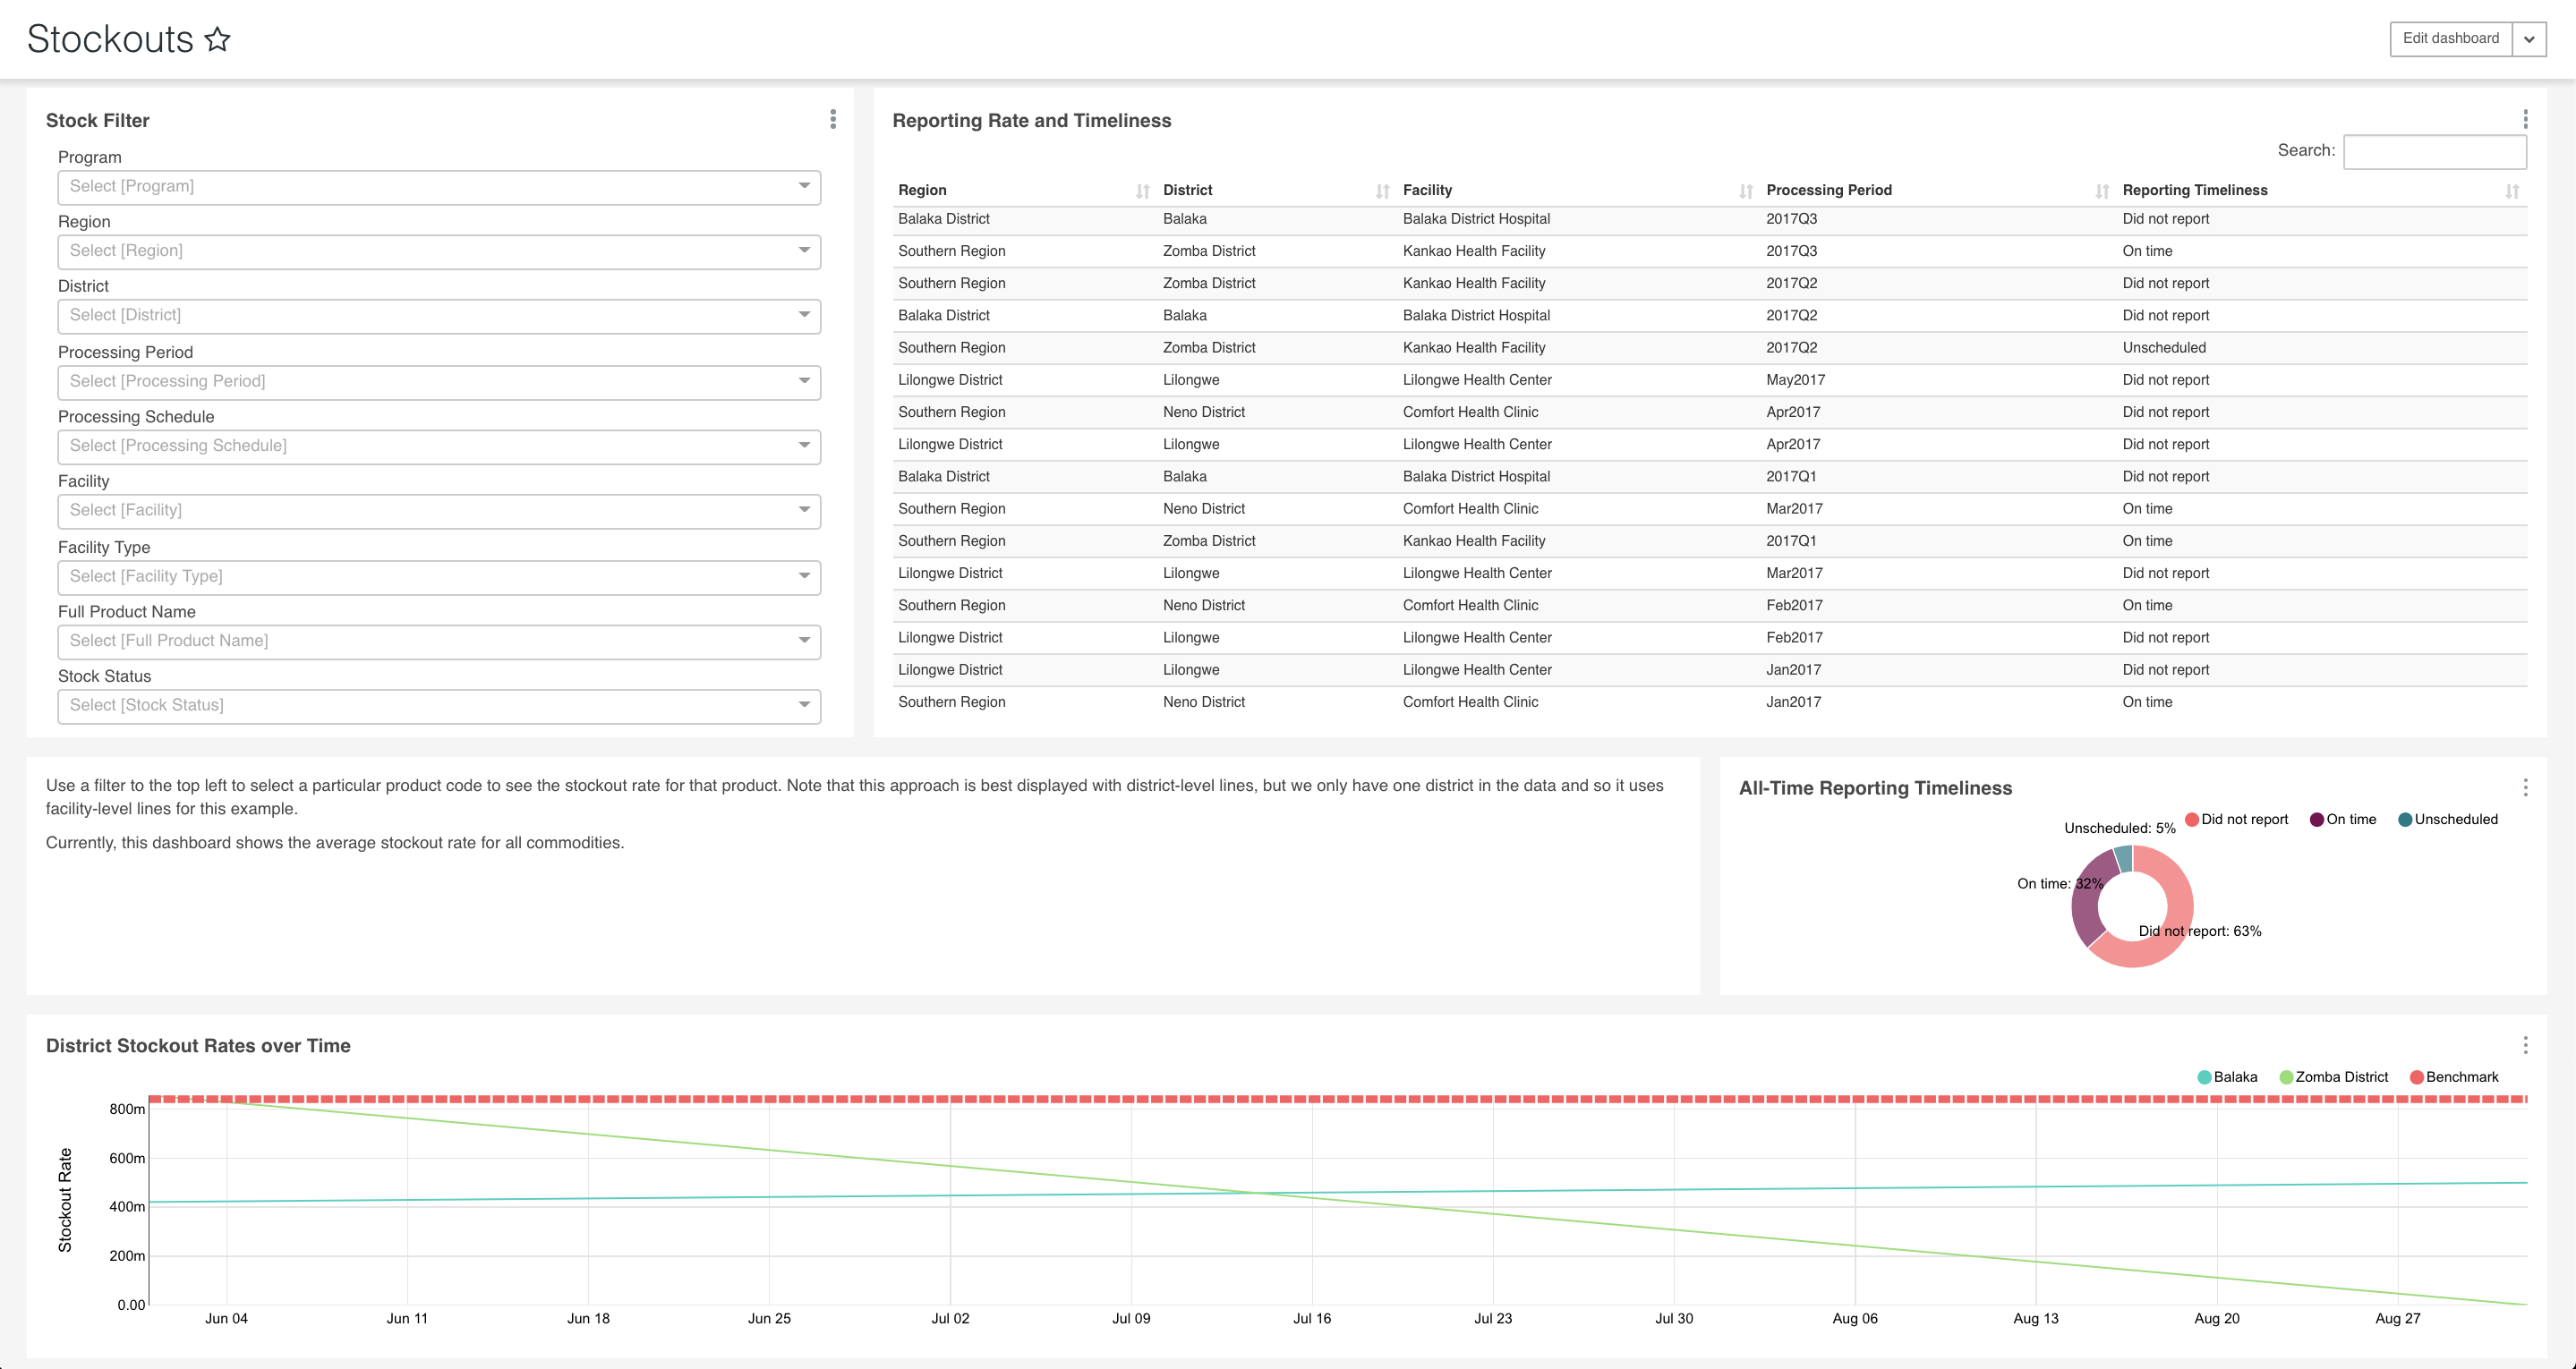
Stockouts
The stockouts dashboard should display 5 charts and 1 markdown row as below. The charts expected are: Stock filter, Reporting Rate and Timeliness,
All-Time Reporting Timeliness and District Stockout Rates over Time. If any of the charts doesn't display as below, the test fails.
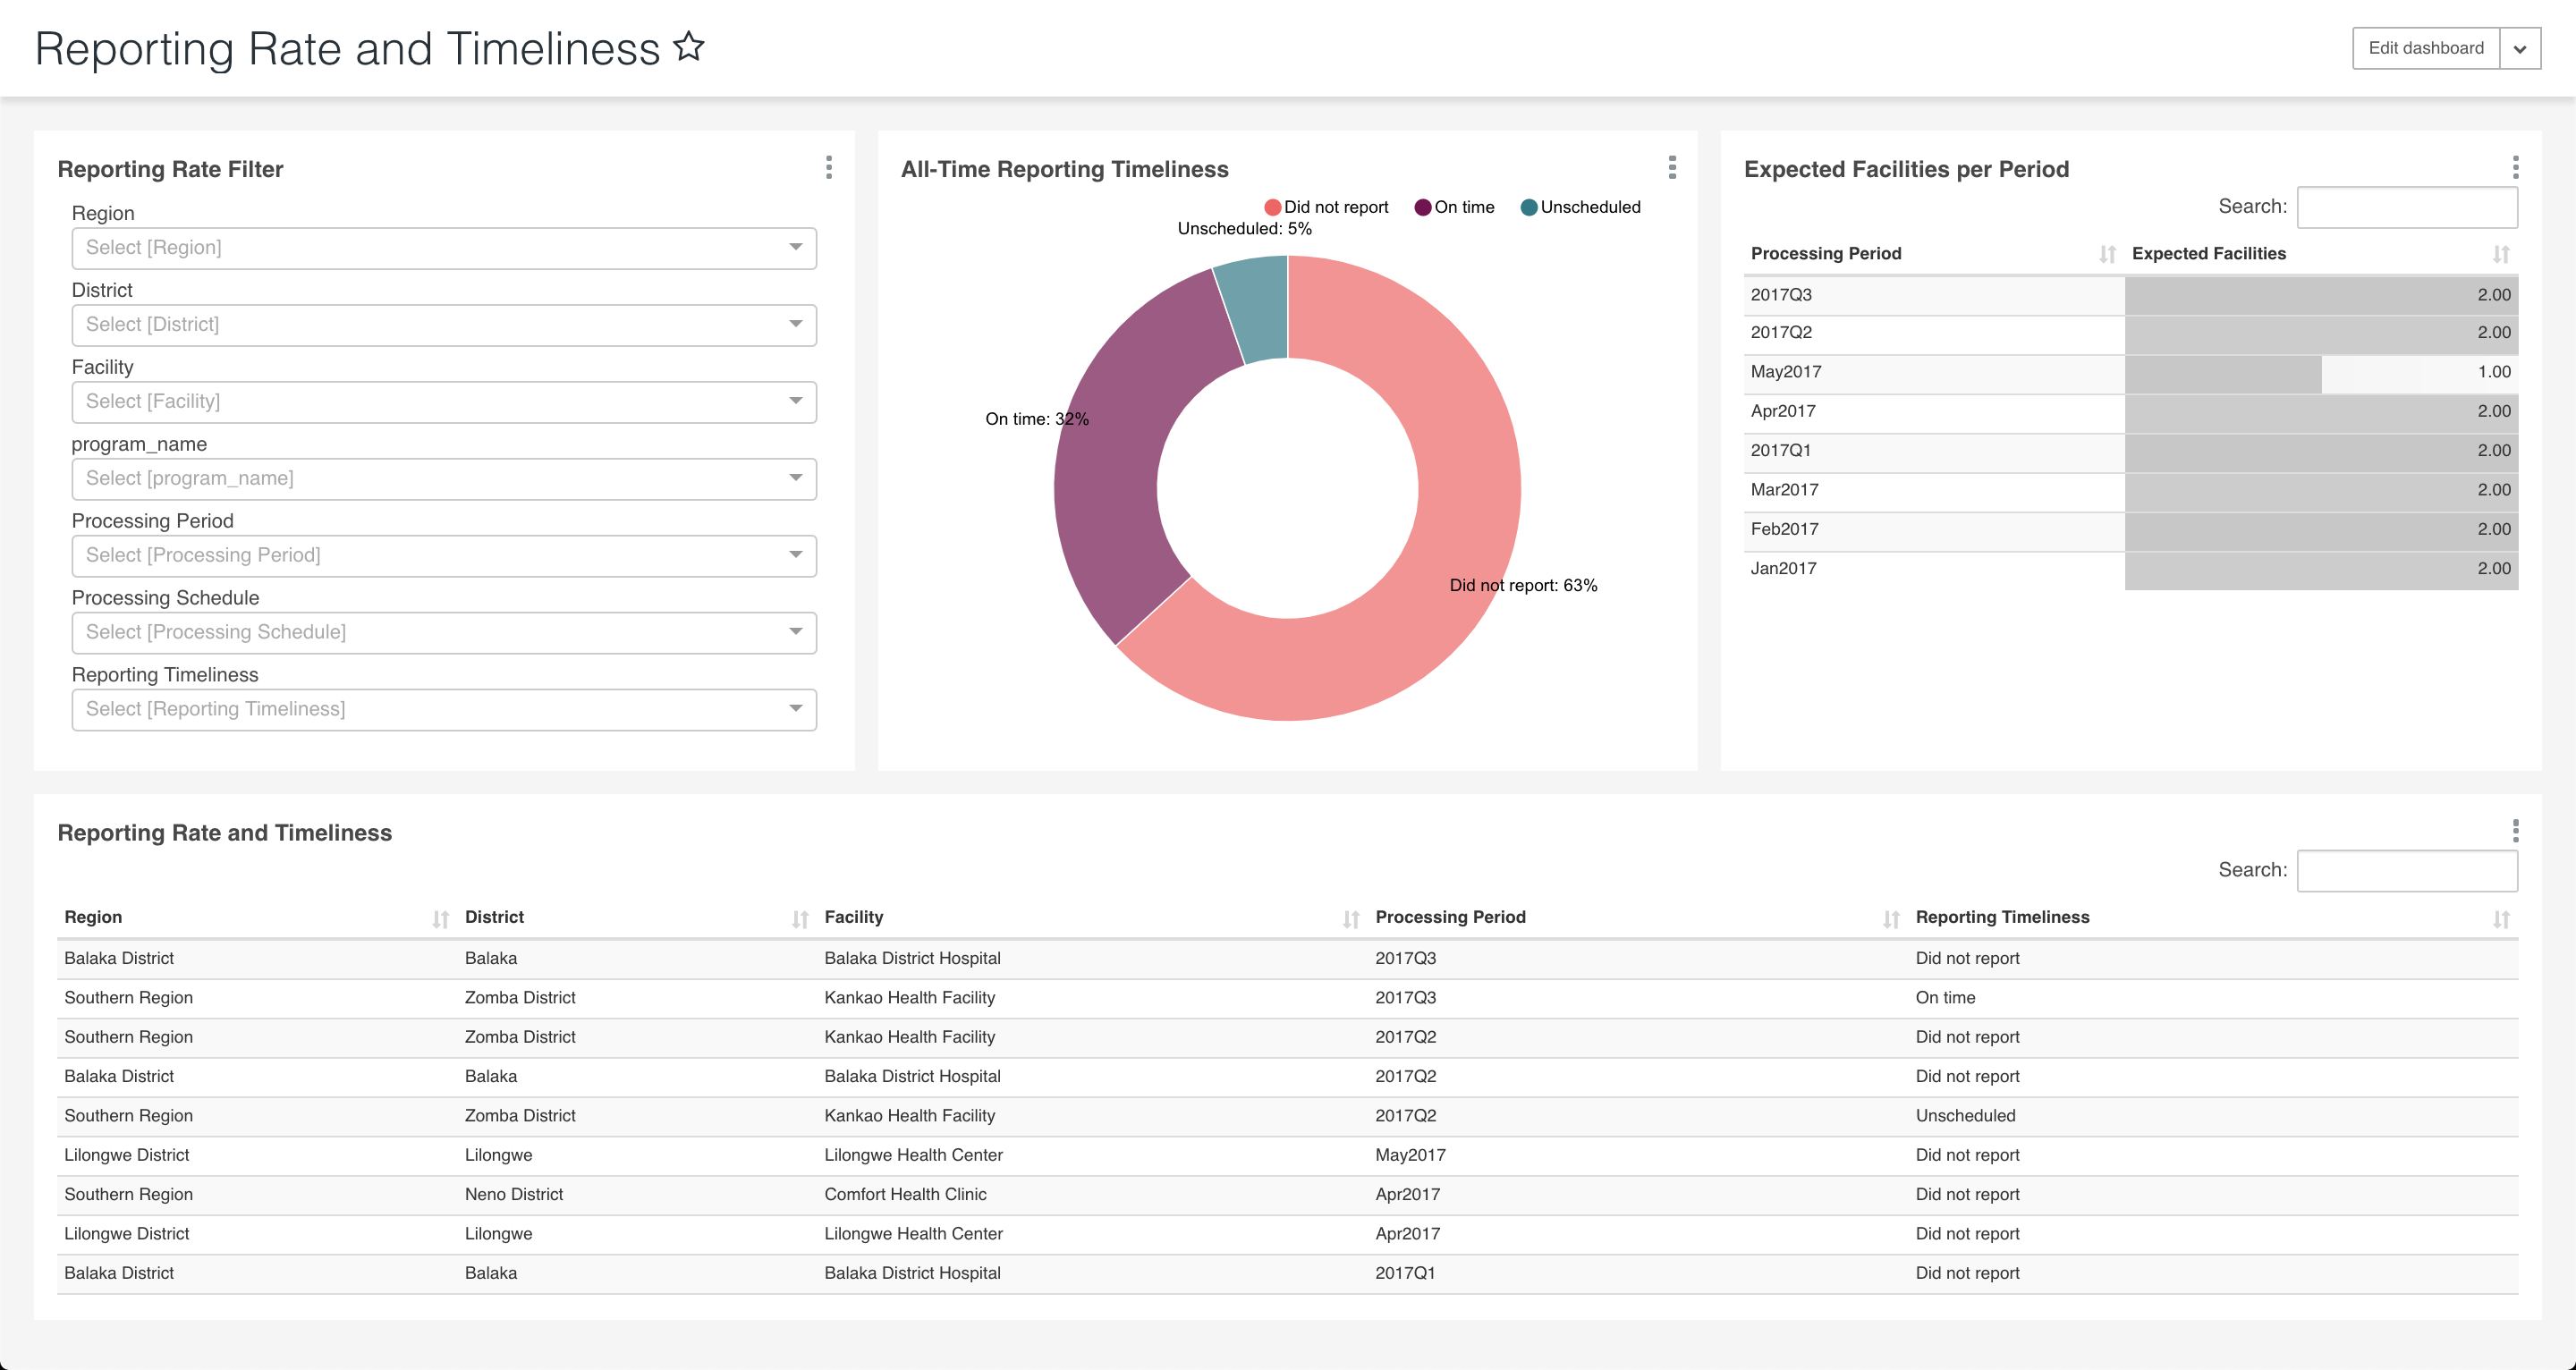
Reporting Rate and Timeliness
Reporting Rate and Timeliness dashboard should display the 4 charts below with no errors. The charts expected are: Reporting Rate Filter, All-Time Reporting Timeliness,
Expected Facilities per Period and Reporting Rate and Timeliness.
Test 5: Validate that Nifi is functioning for Measure and Measure Reports
- Ensure the client username and password is loaded in for token generation for the following processors in Measures and Get MeasureReports process groups:
- Generate Measures > Get Measures > Invoke FHIR token
- Generate Measures > Generate products and measure list > Get Products > Get access token
- Generate MeasureReports > Get Measures > Invoke FHIR token
- Generate MeasureReports > Create Token > Get Access Token
- The client details are defined in the environment file and loaded in preload file
- If any of the Basic user authentication credentials is not loaded, the processor will output the following response and no measures or measure reports generated:
{
  "timestamp": "2019-06-06T14:33:18.300+0000",
  "status": 401,
  "error": "Unauthorized",
  "message": "Bad credentials",
  "path": "/api/oauth/token"
}
Test 6: Validate FHIR Locations are available
- Make a POST request to OpenLMIS with
grant_type=client_credentialsto generate a token with trusted-client credentials - Use the Bearer token above to make a GET request to the locations endpoint on FHIR server https://uat.openlmis.org/hapifhir/Location
- The result should be a JSON with various locations under the entry tree as sampled in the file fhir_locations.json
Test 7: Validate FHIR Measures are available
- Generate a token as in Test 6
- Using the Bearer token from the POST request, make a GET request to FHIR server to the measures endpoint
- The resulting JSON file is as follows fhir_measures.json
- Under the total, confirm that the total measures are 7 for the following expected measures:
- beginning_balance
- total_received_quantity
- total_consumed_quantity
- total_losses_and_adjustments
- total_stock_out_days
- stock_on_hand
- stock_status
Test 8: Validate the quality of each measure
- For each of the 7 measures in FHIR server, ensure that it has the following fields:
- ResourceType
- id
- meta
- name
- Description
- Status
- Experimental
- Group
- Under each group is a dictionary of code text and description
- The measure format should be similar to the sampled Stock status measure
Test 9: Validate the measureReports are available
- Make a POST request to OpenLMIS with
grant_type=client_credentialsto generate a token with trusted-client credentials - Using the token, make a GET request to the MeasureReport endpoint
- The resulting JSON is a list of measure reports generated for the 7 measures using correctly formatted requisitions data
- The total number of measureReports is 77 for the 7 measures and valid 11 requisitions
Test 10: Validate the quality of 7 measureReports for one requisition
- For each measure report, the following fields are expected:
- The following JSON is expected for every measure report
- Each measure report should contain the following fields which can be compared to a requisition:
- resourceType: MeasureReport
- id: MeasureReport ID
- meta: versionID and lastUpdated fields
- identifier: This contains the requisition ID
- status: The requisition status
- type: The measureReport type
- measure: The measure ID
- reporter: Contains the location reference
- period: start and end dates
- group: This contains the programName and their measure scores
- Validate that the information in the measureReport is accurate compared to the source requisition by mapping the following:
- Location
- Requisition id
- Measure
- Period matches the requisition reporting period
- The values for each measure match what was reported in each requisition column
Test 11: Verify Requisition Creates 7 measureReports
- Login to UAT using administrator credentials
- Create a requisition which will be used to test that 7 measureReports are created for that single requisitions
- In NiFi, stop Generate MeasureReports process group and start it once the requisition is approved. At the end of the flow, the 7 reports should have been generated
- Make a POST request to the MeasureReport endpoint of FHIR server with the specific requisition ID as the identifier https://uat.openlmis.org/hapifhir/MeasureReport?identifier=requisition ID
- This will return a total of 7 measureReports sample as follows requisition_reports.json
Test 12: Verify the requisition updated the Superset dashboard
- In NiFi, stop and start the requisitions connector and materialized view process groups to update the requisitions in the database
- Login to superset with administrator credentials to verify the new requisition is reflected in the dashboard
- In the dashboard list, select the Orders dashboard and use the appropriate filters used to create the requisition. The dashboard will change to display the single requisition as follows
Related content
OpenLMIS: the global initiative for powerful LMIS software
