Testing Process & Test Plans
- Sam Im (Deactivated)
![]() Be aware that the screenshots may not match Jira or Zephyr UI exactly due to each system's version updates.
Be aware that the screenshots may not match Jira or Zephyr UI exactly due to each system's version updates.
Viewing JIRA tickets
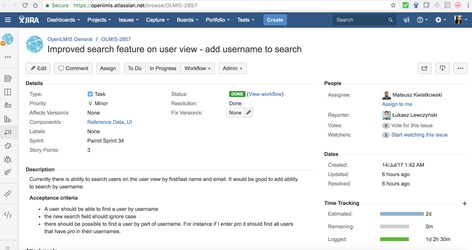
Each development issue within a sprint is tracked by a JIRA ticket. The JIRA tickets contain the acceptance criteria for development, and can also be used to create the expected results for test cases. JIRA tickets are linked to test cases to ensure traceability to requirements. This is an example of a JIRA ticket and its acceptance criteria.
Creating a Test Cycle
Test Cycles are used to manage and monitor the execution of test cases within a sprint, or within a special cycle such as a regression test cycle before a release. A Test Cycle must be created for each occurrence of testing within the sprint. Zephyr restricts running test cases within a scheduled test cycle, so if a test case must be rerun then a new Test Cycle must be created and the QA lead will assign the appropriate test cases to the new Test Cycle.
Creating a regular sprint test cycle:
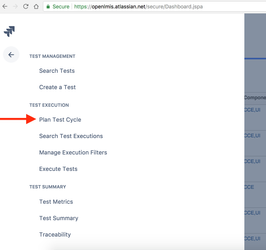
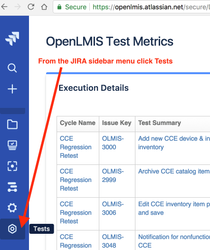
1) In Jira go to Tests, then select Plan a Test Cycle.
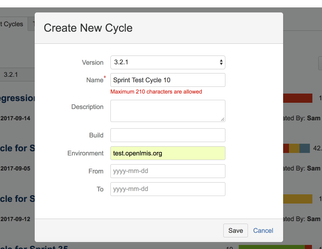
The regular sprint Test Cycle will look like this, enter the Version expected to support this testing, the Test Cycle Name, and the environment where the testing will be done. f the version is unknown, you can select "Unscheduled".
Add Test Cases to the Test Cycle:
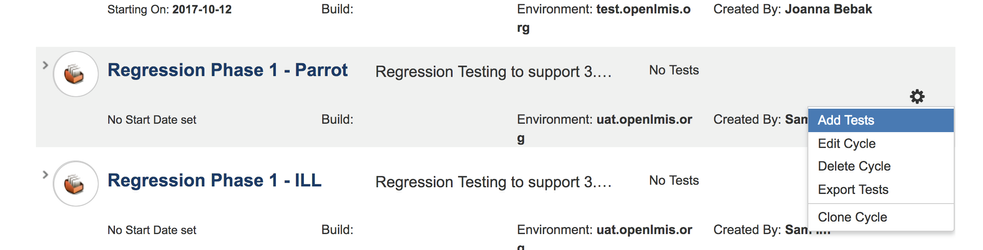
Go to the Test Cycle you created and click the gear icon to the right and click "Add Tests".
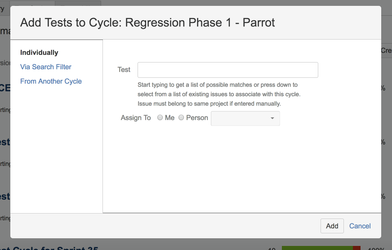
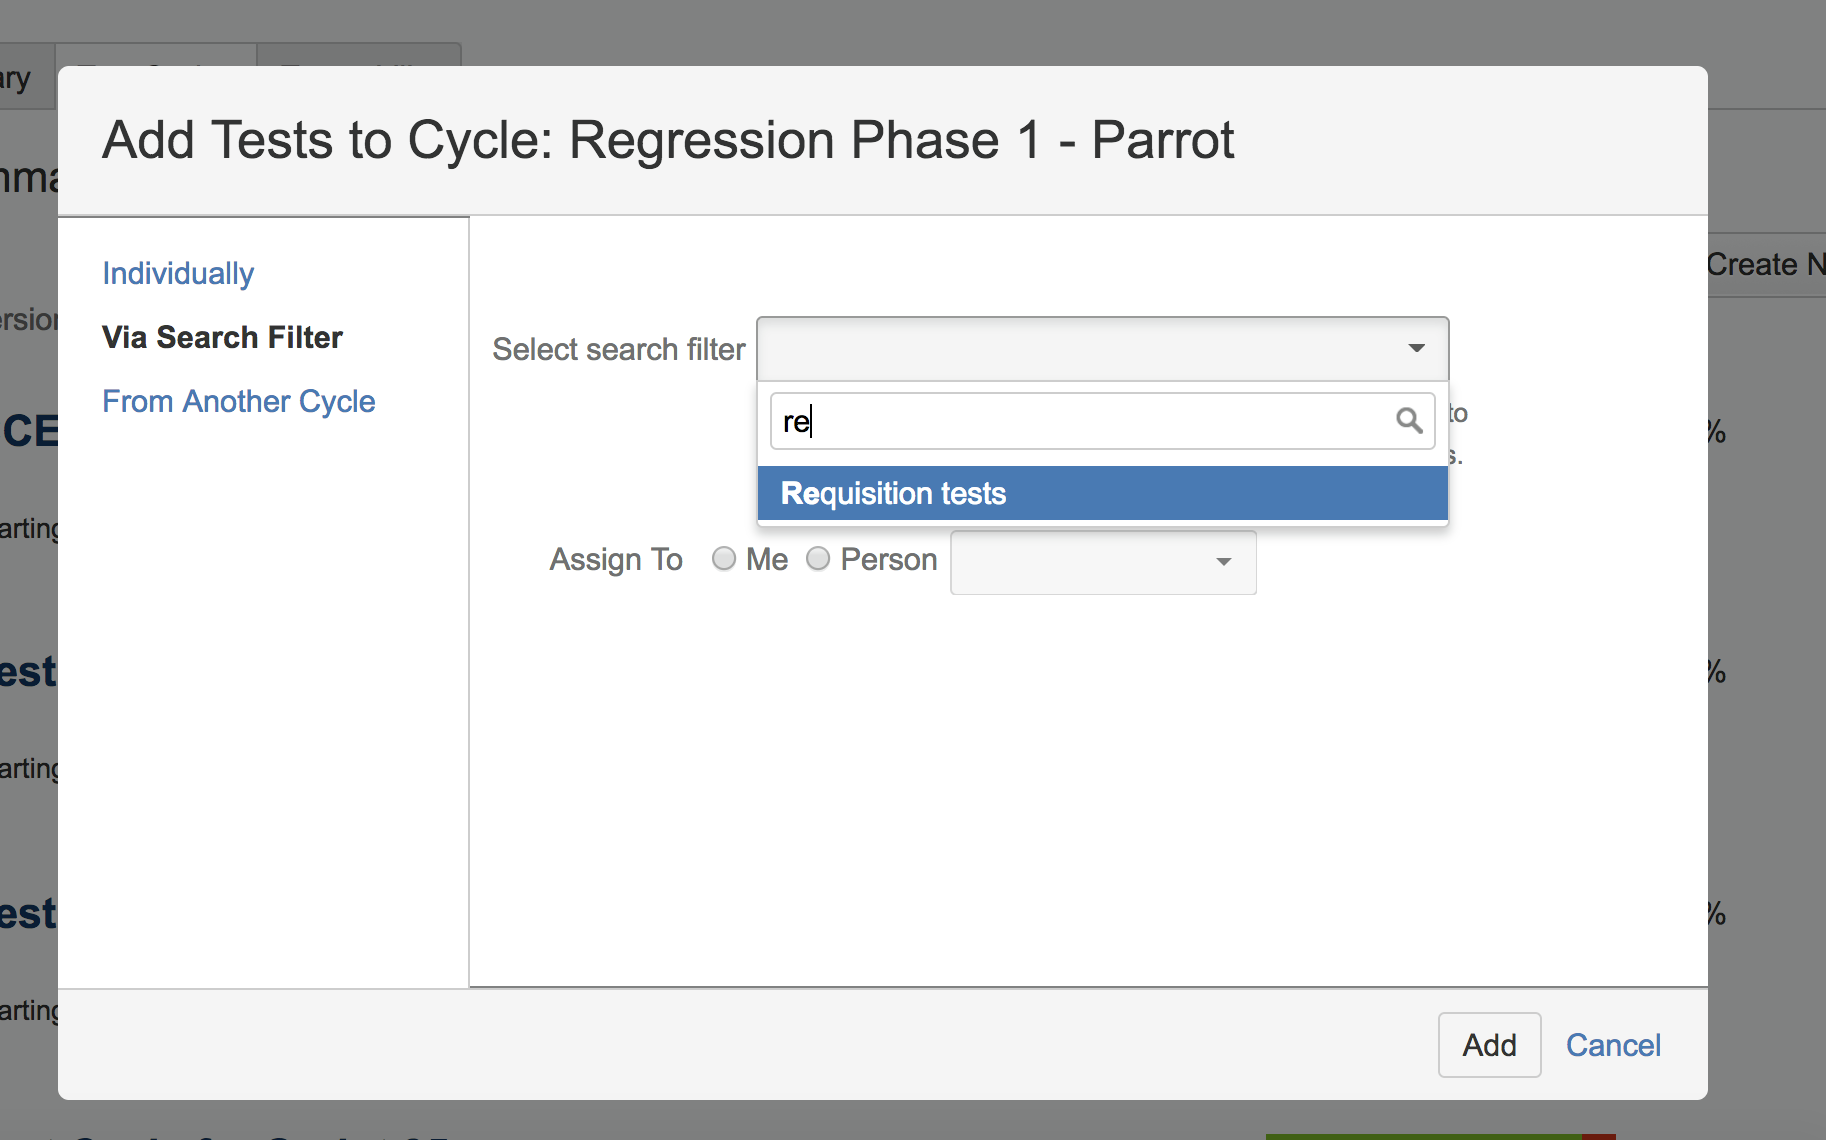
Test cases can be added individually, by a search filter or by another cycle. If you are copying all the test cases from a previous cycle, for example a regression test cycle, then you should choose "From Another Cycle" option.
To create a test cycle using a search filter, you must first create the search filter. For regression test cases we have filters based on a label (Regressions, CCE, StockManagement, and Administration).
Creating a Test Case
Test Cases
Test Cases should be created for each JIRA ticket that is assigned to a sprint and related to a release. Its advised to create test cases before a sprint begins, but this can also be done once a sprint has started. Test cases are not required for tasks or documentation tickets.
Please refer to this live document to follow detailed guidance on test case creation: Regression Testing guide and improvements
See below for a general guidance on test case creation:
Creating a test case:
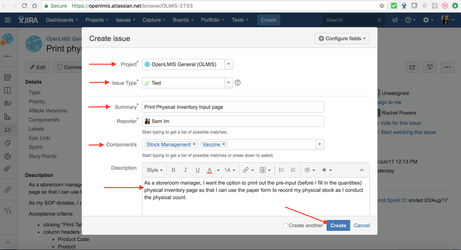
1) In JIRA, click on Create. Select the Project, in this case the project is OpenLMIS General. Then select the Issue Type as Test. The Summary, Components, and Description can be copied from the ticket to keep consistency, or help in rewriting the test case in the next steps. Click Create and a JIRA notification will pop up with the Test Case number.
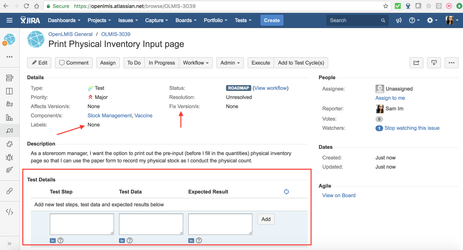
2) Click on the test case number and it will bring you to this page to add the test steps and make required associations. The Labels help when querying for test cases to add to regression test cycles. For the example below, a suggested label would be Stock Management or Vaccines.
3) The Fix Version/s is an association that organizes the test cases. This is used to report test case execution in the Test Metrics Dashboard. If the Fix Version is not known at the time of creating the test, then select "Unscheduled". When the JIRA ticket is assigned to the sprint, the test case must be updated with the correct Fix Version or it will not appear in the Test Metrics Dashboard.
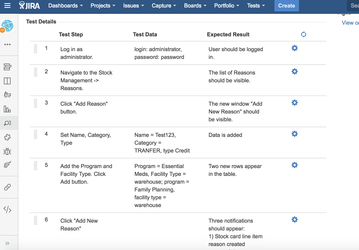
4) The Test Steps provide a step by step guide to any tester on how to complete proper validation of the JIRA ticket. The steps should explain in enough detail to the tester: the actions to make, and a description of the outcome of those steps.
Here is an example of some Test Steps:
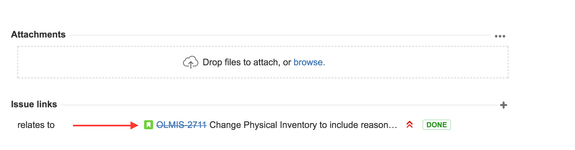
5) Once the test case has been created, it needs to be associated to the JIRA ticket, as the example below:
Executing Test Case
Execute tests within a Test Cycle
Once test cases have been assigned to a Test Cycle the execution of these tests is tracked in Zephyr.
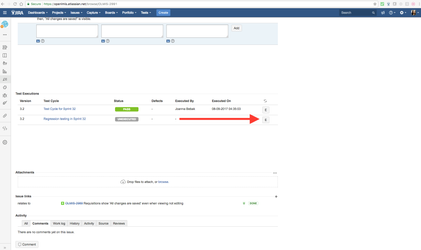
1) When a test is ready to execute, click on the test case to open it and navigate to the bottom of the page where the Test Execution links are shown. Click on the "E" button to begin execution.
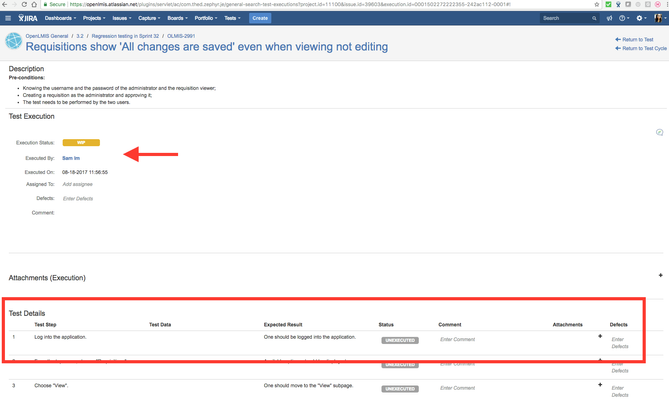
2) The Test Execution page appears that details the test case and each test step.
3) Change the Text Execution Status to WIP. This means that the test case is in progress. Zephyr will assign you as the person executing the test and automatically assign the start date and time. The test execution should show as Assigned to you and Executed by you.
4)Each step has a status, comments, attachments, and defects field. As each step is completed, if the expected result matches the actual result, change the status to Pass. The comments section is used to provide detail to the tester about the step. For example if the first step is to log in, then a tester may write the username they logged in as in the comment section.
If the step does not match, then the status is Failed. If for some reason the step cannot be executed, such as the system is down, then the status would be Blocked.
5) Once each step is completed for a test case, Zephyr will prompt you to update the status of the test case to Pass, Fail, Blocked. If all steps have passed within the test case, then the test case should be updated to Pass. If a defect has been entered for a step within the test case, then the test case status should be updated to Fail. If there were no defects, but for some reason you were unable to complete the test then the status should be updated to Blocked. A reason for a test case to be blocked could be lost internet connection, or an error due to system refresh. The test case status also appears in the Test Metrics Dashboard for tracking purposes.
6) Once the test execution is complete, go back to the Test Case and mark it as Done.
Enter Defects
Enter Defects during sprint testing
If you are testing a ticket during the regular sprint cycle and a test step fails or there is a different result than the expected result, then you must do the following:
1) Change the test step status to FAIL.
2) Explain in the comment section what happened to help others understand the failure. Any details are helpful such as the environment, the username, whether you clicked and received an unexpected error message, or if the system failed to do anything.
3) Determine the status of the test case based on the failures. If the test steps that cannot be executed are part of the acceptance criteria for the Jira ticket, then the test case should have a status of FAIL. The Jira ticket status will also need to move back from In QA to In Progress for the developer. The steps that have failed should be included in a comment on the original Jira ticket for the developer to review (and also saved in the comments of the test case execution for follow-up later).
4) When a test case is marked as failed, the developer must be notified (via mention) in the Jira ticket, as well as notified in the QA Slack channel. This is the only way to ensure follow up and fixing of the issues that caused the step to fail.
5) Once the issue has been resolved by the developer, the developer must reassign the Jira ticket to the QA person, notify them either via Slack channel or directly, and then the QA person must execute the test case again. It is the team's responsibility, as well as the developer's responsibility, to ensure any tickets in the QA column are being moved and progressed during a sprint.
During regression testing, if a test step fails and there is a different result, or an error appears that is not expected, then a defect must be entered. The steps to create a defect are detailed below.
Entering Defects during Regression testing
1) Within the test case execution, click on the Defects Column and Create New Issue. Make sure you have the original developer Jira ticket open, the original test case open, as well as a new window for the defect open so that you can easily copy and paste details in step 2.

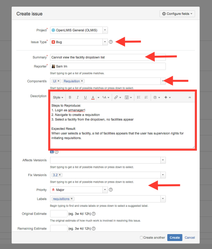
2) The Issue Type is Bug, and the Summary, Description, Priority, Environment, and original linked JIRA ticket should all be added.
The Summary is a short description of the bug, while the Description is a detailed step by step explanation of how to reproduce the bug, and what the expected result is per the test case step.
When detailing the steps to reproduce the bug, it is also helpful that you walk through these steps and attempt to reproduce the bug yourself. Please add notes in the description when this has been successfully reproduced by you.
The Environment should be either test.openlmis.org or uat.openlmis.org , and you should provide as much detail about the environment that would help a developer when reproducing the bug, such as in which browser you tested (Chrome or Firefox).
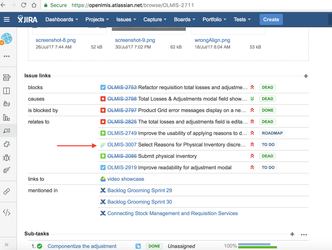
3)The new bug should be linked to the JIRA ticket that is linked to the test case.
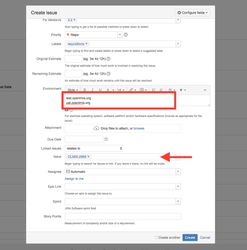
4) When a defect is created it will automatically get sent to the Roadmap. Remember to open the defect once it has been created and change the status to "To Do" so that it appears in the backlog to prioritize.
![]() Tips for reproducing and recording defects
Tips for reproducing and recording defects
- Record screenshots or video
- Document steps to reproduce, then walk through your steps when recording to ensure you have listed all the necessary steps in the defect.
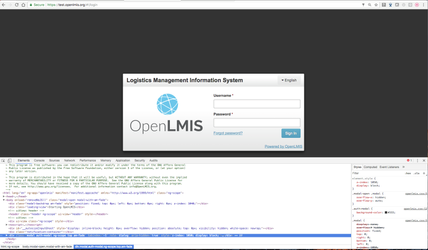
- Advanced: View Developer Tools
- In Chrome this is how you access Developer Tools: Right click on the web page, click Inspect, then the developer tools should show as per example:
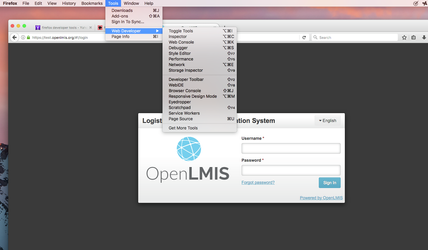
- In Firefox this is how you access Developer Tools: From the Firefox menu select Tools, click Web Developer, then you will need to select which tool to view:
- In Chrome this is how you access Developer Tools: Right click on the web page, click Inspect, then the developer tools should show as per example:
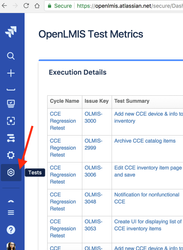
Search for Test Cases by Component or by Label
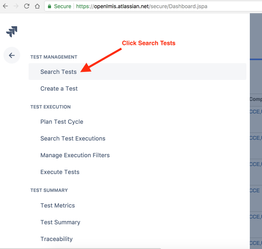
Go to Jira and click the sidebar menu to search for tests:
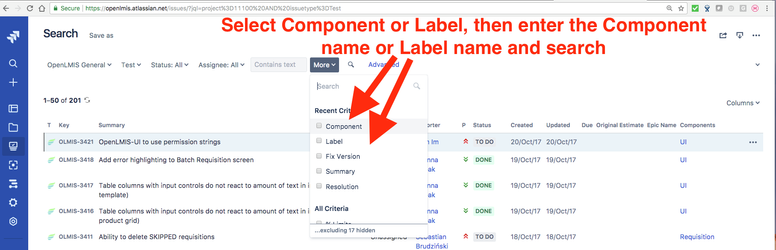
Select the Component or Label and enter in the component name or label name and search.
Click Save As to save the search filter so that it can be used to pull in all associated test cases when creating a test cycle.
When creating the Test Cycle, this is what it looks like to add Test Cases using the search filter:
Assigning Test Cases to a tester:
Once test cases have been added to a Test Cycle they must be assigned individually. Click on the test case and assign to each user. Make sure the test case is in a status of "To Do" so that each tester knows the test case is ready to be executed.
Related content
OpenLMIS: the global initiative for powerful LMIS software