OpenSRP Mobile Stock Management Demo Script
- Craig Appl (Unlicensed)
This page documents the script for demonstrating the OpenSRP Mobile Stock Management platform that interacts with OpenLMIS.
Solution Overview
Ona developed a mobile application that downloads metadata from OpenLMIS and supports managing stock offline on an Android tablet. The core functionality includes tracking both lot managed and non-lot managed stock items by program in the OpenSRP tablet. Users are able to generate issued, received, and loss/adjustment stock events for a single trade item. Additionally, users are able to perform a stocktake (Physical Inventory) in the app. Each stock event is pushed from the OpenSRP tablet to the OpenSRP server which then integrates with OpenLMIS using Apache Nifi.
Setup
Demonstration users need to download the latest version of the APK on their Android tablet or emulator. It must be side loaded into the tablet in order to function.
Steps:
- Open the browser on your tablet or emulator
- Type in the following URL: http://bit.ly/2K3kq7Y
- Touch the Download button
- Open the APK and it will try to install.
- Some devices do now allow you to load apps from unknown sources. If an error pops up, follow the prompt to enable apps obtained from unknown sources (Setttings > Security then toggle the item labeled Unknown sources)
- Open the app menu by sliding up and choose "OpenLMIS Sample"
- Credentials:
- EPI Program Access to Lurio, Cuamba: vnurse1|password
| Screenshot | Action |
|---|---|
 |
|
 |
|
 | This is the landing page that you should see and the setup is complete. |
Demonstration Script
Screenshot | Script | Action |
|---|---|---|
| This is the home screen of the OpenSRP sample app. We will enter the username and password to login. |
|
| This is the landing page that shows all available stock items that are being tracked for this program.
Transition: Now, let's navigate to see the stock card view for a Lot Managed Trade Item |
Transition: Touch the RotaTeq (1 dose) row |
| This is the stock card view screen for a lot managed trade item. The top card provides a summary of the current stock on hand and provides three buttons to initiate actions. The middle card shows the stock on hand of all available lots for the RotaTeq immunization. This list of lots is populated from OpenLMIS, which retains central control of the available lots across the system. The bottom card displays a history of all transactions for this trade item. Each row represents a stock event that is captured at the lot level. So, you can see we received three lots on October 24th 2018. We can perform three actions from this screen. We can track items that were received, issued and we can record losses and adjustments that happened. Let's show record a transaction that was received. | Transition: Touch the Received button |
| We have now entered a multi-step form that allows us to record a receipt of an item from a central store.
Transition: we will touch next to view the second step in the form. |
Transition: Touch the NEXT button in the bottom right corner |
| This screen allows you to identify which lots you wish to receive for this trade item. Again, this list of lots is downloaded from OpenLMIS.
We can add the other two lots to this transaction by touching the ADD LOT text and recording a quantity against them if we wish, but we won't do that right now for simplicity sake. I also want to note that the VVM1 status is configurable per trade item by a system administrator. Some vaccines require tracking VVM status and others don't. Transition: We will touch the REVIEW button and proceed to the summary screen. |
Transition: Touch the Review button in the bottom right corner |
| This is the summary screen of the stock transaction that shows the information we typed from the previous two steps. You can see the date, location, reason and lot level details. You can return to the first step if something needs to be corrected. Transition: We will touch SUBMIT to save this transaction. | Transition: Touch the SUBMIT button in the bottom right corner |
| Now, you can see the transaction was saved in the record. You can see that 5 vials were received on October 26th from Balaka District Warehouse. Transition: Next, we will walk through a similar process to record Issued stock events on the 27th of October. To do that, we will touch the Issued button in the top of the screen. | Transition: Touch the Issued Button. |
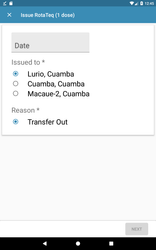
| We follow the same multi-step form process. Note that the issued to and reasons are different from the Received transaction type. We will issue items on 27 Oct 2018 and issue stock to Cuamba, Cuamba Transition: We will touch the next button to move to the next step. |
Transition: Touch the next button. |
| We will Issue 3 vials to Cuamba from the first lot. Transition: We will touch Review to go to the review step. |
Transition: Touch review. |
| Everything looks good, so we will touch SUBMIT. | Transition: Touch SUBMIT button in the bottom right corner. |
| We can see that the transaction was added. Transition: Now, we want to record a loss or adjustment. To do that, we need to touch the Loss/Adjust button in the top card. | Transition: Touch Loss/Adjust button. |
| This is a single step form that allows us to track a loss or adjustment per lot. Let's say someone opened a vial but didn't use it. They put it back in the freezer, but it passed the open-vial time limit on the 30th of October 2018. We need to record the loss for that vial.
Transition: Then we can save this form and go back to the stock card view where we can see a loss of 1 vial. |
Transition: Touch the SAVE button in the bottom right corner. |
| That shows all of the transactions for lot managed trade items. Transition: Next, we will navigate back to the landing page and look at a trade item that isn't managed at the lot level. | Transition: Touche the back button in the top left corner. |
| We will look at the Measles MMR II immunization. Transition: Let's touch Measles and then touch MMR II to enter that stock view. | Transition: Touch Measles (1) commodity type and then the MMR II row. |
| This view and the related forms are much more simple than for lot managed trade items. This view shows the summary card in the top and the transaction history in the bottom. Each of the forms are single step forms because we don't need to capture lot information. Transition: Let's enter the received form | Transition: Touch the received button. |
| As you can see, the first three fields are the same. We add the Quantity and Status to this screen. Transition: We will touch submit in the top right corner to submit this transaction. |
Transition: Touch submit in the top right corner. |
| You can see that that transaction has been added to the transaction record. We have similar forms for Issued and Loss/Adjustment transaction types. Transition: Now, we will navigate back to the landing page and perform a stocktake. | Transition: Touch the back button in the top left corner |
| We touch the + button in the bottom right corner to initiate a stock take. |
|
| This is the stocktake form that allows a user to perform a physical inventory by program. This form displays all trade items organized by commodity type. It displays both lot managed and non-lot managed items. Users are expected to enter an adjustment quantity and reason for each lot or trade item in their inventory for the program. Each row shows the current stock on hand and allows the user to either add, subtract or enter any changes based on their physical count. If there is an adjustment, the user is prompted to enter a reason. We chose to have a "No Change" button for each row so we can ensure the user actually counted that item. To get started, we assume the user has opened their freezer and counted the total number of RotaTeq vials that they have on hand. The stock on hand for the first two items are correct, but the third lot should be 3 instead of 4 | |
| We will hit the "No Change" button next to the first two lots. You can see that the fields are now grayed out. | Touch No Change next to the first two rows under RotaTeq. |
| Now, we need to adjust the third row by one unit, so the physical count is 3 instead of 4. In order to do that, we touch the minus sign next to the physical count. Now the difference pops up and the user is prompted for a reason. When the user touches a reason, they can now save that trade item. |
|
| The RotaTeq trade item is complete for this stock take. | |
| We perform the physical count for all of the other items and for each realize there are no changes, so we touch the No Change button for each trade item and lot that is presented. When complete, we can see a view with green check marks for each trade item signaling that all items in the stocktake have been completed. Note that a user can save a draft of the stocktake at anytime and return to it. When the user is finished, you can touch the SUBMIT button and the stocktake will create a stock event for each adjustment that has been captured, including 0 for those items that had no change. Transition: We can go to the Pentavac PFS (1 dose) screen and see what it looks like. | Touch "No Change" and "Save" for each of the remaining trade items. Touch "Submit" when finished. Transition: Touch back and touch the Pentavalent commodity type row, then Pentavac PFS (1 dose) |
| As you can see, this screen shows the 0 item loss/adjustment transaction that represents a stocktake. That concludes our presentation. Thank you for joining. |


Related content
OpenLMIS: the global initiative for powerful LMIS software